An Obsidian plugin that embeds Claude Code as an AI collaborator in your vault
Claudian


An Obsidian plugin that embeds AI coding agents (Claude Code, Codex, and more to come) in your vault. Your vault becomes the agent's working directory — file read/write, search, bash, and multi-step workflows all work out of the box.
Features & Usage
Open the chat sidebar from the ribbon icon or command palette. Select text and use the hotkey for inline edit. Everything works like Claude Code or Codex — talk to the agent, and it reads, writes, edits, and searches files in your vault.
Inline Edit — Select text or start at the cursor position + hotkey to edit directly in notes with word-level diff preview.
Slash Commands & Skills — Type / or $ for reusable prompt templates or Skills from user- and vault-level scopes.
@mention - Type @ to mention anything you want the agent to work with, vault files, subagents, MCP servers, or files in external directories.
Plan Mode — Toggle via Shift+Tab. The agent explores and designs before implementing, then presents a plan for approval.
Instruction Mode (#) — Refined custom instructions added from the chat input.
MCP Servers — Connect external tools via Model Context Protocol (stdio, SSE, HTTP). Claude manages vault MCP in-app; Codex uses its own CLI-managed MCP configuration.
Multi-Tab & Conversations — Multiple chat tabs, conversation history, fork, resume, and compact.
Requirements
- Claude provider: Claude Code CLI installed (native install recommended). Claude subscription/API or compatible provider (Openrouter, Kimi, etc.).
- Codex provider (optional): Codex CLI installed.
- Obsidian v1.4.5+
- Desktop only (macOS, Linux, Windows)
Installation
From GitHub Release (recommended)
- Download
main.js,manifest.json, andstyles.cssfrom the latest release - Create a folder called
claudianin your vault's plugins folder:/path/to/vault/.obsidian/plugins/claudian/ - Copy the downloaded files into the
claudianfolder - Enable the plugin in Obsidian:
- Settings → Community plugins → Enable "Claudian"
Using BRAT
BRAT (Beta Reviewers Auto-update Tester) allows you to install and automatically update plugins directly from GitHub.
- Install the BRAT plugin from Obsidian Community Plugins
- Enable BRAT in Settings → Community plugins
- Open BRAT settings and click "Add Beta plugin"
- Enter the repository URL:
https://github.com/YishenTu/claudian - Click "Add Plugin" and BRAT will install Claudian automatically
- Enable Claudian in Settings → Community plugins
Tip: BRAT will automatically check for updates and notify you when a new version is available.
From source (development)
-
Clone this repository into your vault's plugins folder:
cd /path/to/vault/.obsidian/plugins git clone https://github.com/YishenTu/claudian.git cd claudian -
Install dependencies and build:
npm install npm run build -
Enable the plugin in Obsidian:
- Settings → Community plugins → Enable "Claudian"
Development
# Watch mode
npm run dev

# Production build
npm run build
Tip: Copy
.env.local.exampleto.env.localornpm installand setup your vault path to auto-copy files during development.
Privacy & Data Use
- Sent to API: Your input, attached files, images, and tool call outputs. Default: Anthropic (Claude) or OpenAI (Codex); configurable via environment variables.
- Local storage: Claudian settings and session metadata in
vault/.claudian/; Claude provider files invault/.claude/; transcripts in~/.claude/projects/(Claude) and~/.codex/sessions/(Codex). - No telemetry: No tracking beyond your configured API provider.
Troubleshooting
Claude CLI not found
If you encounter spawn claude ENOENT or Claude CLI not found, the plugin can't auto-detect your Claude installation. Common with Node version managers (nvm, fnm, volta).
Solution: Find your CLI path and set it in Settings → Advanced → Claude CLI path.
| Platform | Command | Example Path |
|---|---|---|
| macOS/Linux | which claude |
/Users/you/.volta/bin/claude |
| Windows (native) | where.exe claude |
C:\Users\you\AppData\Local\Claude\claude.exe |
| Windows (npm) | npm root -g |
{root}\@anthropic-ai\claude-code\cli.js |
Note: On Windows, avoid
.cmdwrappers. Useclaude.exeorcli.js.
Alternative: Add your Node.js bin directory to PATH in Settings → Environment → Custom variables.
npm CLI and Node.js not in same directory
If using npm-installed CLI, check if claude and node are in the same directory:
dirname $(which claude)
dirname $(which node)
If different, GUI apps like Obsidian may not find Node.js.
Solutions:
- Install native binary (recommended)
- Add Node.js path to Settings → Environment:
PATH=/path/to/node/bin
Codex provider
Codex support is live but still needs more testing across platforms and installation methods. If you run into any bugs, please submit a GitHub issue.
Architecture
src/
├── main.ts                      # Plugin entry point
├── app/                         # Shared defaults and plugin-level storage
├── core/                        # Provider-neutral runtime, registry, and type contracts
│   ├── runtime/                 # ChatRuntime interface and approval types
│   ├── providers/               # Provider registry and workspace services
│   ├── security/                # Approval utilities
│   └── ...                      # commands, mcp, prompt, storage, tools, types
├── providers/
│   ├── claude/                  # Claude SDK adaptor, prompt encoding, storage, MCP, plugins
│   └── codex/                   # Codex app-server adaptor, JSON-RPC transport, JSONL history
├── features/
│   ├── chat/                    # Sidebar chat: tabs, controllers, renderers
│   ├── inline-edit/             # Inline edit modal and provider-backed edit services
│   └── settings/                # Settings shell with provider tabs
├── shared/                      # Reusable UI components and modals
├── i18n/                        # Internationalization (10 locales)
├── utils/                       # Cross-cutting utilities
└── style/                       # Modular CSS
Roadmap
License
Licensed under the MIT License.
Star History
Acknowledgments
- Obsidian for the plugin API
- Anthropic for Claude and the Claude Agent SDK
- OpenAI for Codex
VoxCPM2: Tokenizer-Free TTS for Multilingual Speech Generation, Creative Voice Design, and True-to-Life Cloning
VoxCPM2: Tokenizer-Free TTS for Multilingual Speech Generation, Creative Voice Design, and True-to-Life Cloning
English | 中文
👋 Join our community for discussion and support!
![]() Feishu |
Feishu | ![]() Discord
Discord
VoxCPM is a tokenizer-free Text-to-Speech system that directly generates continuous speech representations via an end-to-end diffusion autoregressive architecture, bypassing discrete tokenization to achieve highly natural and expressive synthesis.
VoxCPM2 is the latest major release — a 2B parameter model trained on over 2 million hours of multilingual speech data, now supporting 30 languages, Voice Design, Controllable Voice Cloning, and 48kHz studio-quality audio output. Built on a MiniCPM-4 backbone.
✨ Highlights
- 🌍 30-Language Multilingual — Input text in any of the 30 supported languages and synthesize directly, no language tag needed
- 🎨 Voice Design — Create a brand-new voice from a natural-language description alone (gender, age, tone, emotion, pace …), no reference audio required
- 🎛️ Controllable Cloning — Clone any voice from a short reference clip, with optional style guidance to steer emotion, pace, and expression while preserving the original timbre
- 🎙️ Ultimate Cloning — Reproduce every vocal nuance: provide both reference audio and its transcript, and the model continues seamlessly from the reference, faithfully preserving every vocal detail — timbre, rhythm, emotion, and style (same as VoxCPM1.5)
- 🔊 48kHz High-Quality Audio — Accepts 16kHz reference audio and directly outputs 48kHz studio-quality audio via AudioVAE V2's asymmetric encode/decode design, with built-in super-resolution — no external upsampler needed
- 🧠 Context-Aware Synthesis — Automatically infers appropriate prosody and expressiveness from text content
- ⚡ Real-Time Streaming — RTF as low as ~0.3 on NVIDIA RTX 4090, and ~0.13 accelerated by Nano-VLLM
- 📜 Fully Open-Source & Commercial-Ready — Weights and code released under the Apache-2.0 license, free for commercial use
Arabic, Burmese, Chinese, Danish, Dutch, English, Finnish, French, German, Greek, Hebrew, Hindi, Indonesian, Italian, Japanese, Khmer, Korean, Lao, Malay, Norwegian, Polish, Portuguese, Russian, Spanish, Swahili, Swedish, Tagalog, Thai, Turkish, Vietnamese
Chinese Dialect: 四川话, 粤语, 吴语, 东北话, 河南话, 陕西话, 山东话, 天津话, 闽南话
News
- [2026.04] 🔥 We release VoxCPM2 — 2B, 30 languages, Voice Design & Controllable Voice Cloning, 48kHz audio output! Weights | Docs | Playground
- [2025.12] 🎉 Open-source VoxCPM1.5 weights with SFT & LoRA fine-tuning. (🏆 #1 GitHub Trending)
- [2025.09] 🔥 Release VoxCPM Technical Report.
- [2025.09] 🎉 Open-source VoxCPM-0.5B weights (🏆 #1 HuggingFace Trending)
Contents
- Quick Start
- Models & Versions
- Performance
- Fine-tuning
- Documentation
- Ecosystem & Community
- Risks and Limitations
- Citation
🚀 Quick Start
Installation
pip install voxcpm
Requirements: Python ≥ 3.10 (❤️.13), PyTorch ≥ 2.5.0, CUDA ≥ 12.0. See Quick Start Docs for details.
Python API
🗣️ Text-to-Speech
from voxcpm import VoxCPM
import soundfile as sf

model = VoxCPM.from_pretrained(
  "openbmb/VoxCPM2",
  load_denoiser=False,
)

wav = model.generate(
    text="VoxCPM2 is the current recommended release for realistic multilingual speech synthesis.",
    cfg_value=2.0,
    inference_timesteps=10,
)
sf.write("demo.wav", wav, model.tts_model.sample_rate)
print("saved: demo.wav")
If you prefer downloading from ModelScope first, you can use:
pip install modelscope
from modelscope import snapshot_download
snapshot_download("OpenBMB/VoxCPM2", local_dir='./pretrained_models/VoxCPM2') # specify the local directory to save the model

from voxcpm import VoxCPM
import soundfile as sf
model = VoxCPM.from_pretrained("./pretrained_models/VoxCPM2", load_denoiser=False)

wav = model.generate(
    text="VoxCPM2 is the current recommended release for realistic multilingual speech synthesis.",
    cfg_value=2.0,
    inference_timesteps=10,
)
sf.write("demo.wav", wav, model.tts_model.sample_rate)
🎨 Voice Design
Create a voice from a natural-language description — no reference audio needed. Format: put the description in parentheses at the start of text(e.g. "(your voice description)The text to synthesize."):
wav = model.generate(
    text="(A young woman, gentle and sweet voice)Hello, welcome to VoxCPM2!",
    cfg_value=2.0,
    inference_timesteps=10,
)
sf.write("voice_design.wav", wav, model.tts_model.sample_rate)
🎛️ Controllable Voice Cloning
Upload a reference audio. The model clones the timbre, and you can still use control instructions to adjust speed, emotion, or style.
wav = model.generate(
    text="This is a cloned voice generated by VoxCPM2.",
    reference_wav_path="path/to/voice.wav",
)
sf.write("clone.wav", wav, model.tts_model.sample_rate)

wav = model.generate(
    text="(slightly faster, cheerful tone)This is a cloned voice with style control.",
    reference_wav_path="path/to/voice.wav",
    cfg_value=2.0,
    inference_timesteps=10,
)
sf.write("controllable_clone.wav", wav, model.tts_model.sample_rate)
🎙️ Ultimate Cloning
Provide both the reference audio and its exact transcript for audio-continuation-based cloning with every vocal nuance reproduced. For maximum cloning similarity, pass the same reference clip to both reference_wav_path and prompt_wav_path as shown below:
wav = model.generate(
    text="This is an ultimate cloning demonstration using VoxCPM2.",
    prompt_wav_path="path/to/voice.wav",
    prompt_text="The transcript of the reference audio.",
    reference_wav_path="path/to/voice.wav", # optional, for better simliarity
)
sf.write("hifi_clone.wav", wav, model.tts_model.sample_rate)
🔄 Streaming API
import numpy as np

chunks = []
for chunk in model.generate_streaming(
    text="Streaming text to speech is easy with VoxCPM!",
):
    chunks.append(chunk)
wav = np.concatenate(chunks)
sf.write("streaming.wav", wav, model.tts_model.sample_rate)
CLI Usage
# Voice design (no reference audio needed)
voxcpm design \
  --text "VoxCPM2 brings studio-quality multilingual speech synthesis." \
  --output out.wav

# Controllable voice cloning with style control
voxcpm design \
  --text "VoxCPM2 brings studio-quality multilingual speech synthesis." \
  --control "Young female voice, warm and gentle, slightly smiling" \
  --output out.wav

# Voice cloning (reference audio)
voxcpm clone \
  --text "This is a voice cloning demo." \
  --reference-audio path/to/voice.wav \
  --output out.wav

# Ultimate cloning (prompt audio + transcript)
voxcpm clone \
  --text "This is a voice cloning demo." \
  --prompt-audio path/to/voice.wav \
  --prompt-text "reference transcript" \
  --reference-audio path/to/voice.wav \ # optional, for better simliarity
  --output out.wav

# Batch processing
voxcpm batch --input examples/input.txt --output-dir outs

# Help
voxcpm --help
Web Demo
python app.py --port 8808 # then open in browser: http://localhost:8808
🚢 Production Deployment (Nano-vLLM)
For high-throughput serving, use Nano-vLLM-VoxCPM — a dedicated inference engine built on Nano-vLLM with concurrent request support and an async API.
pip install nano-vllm-voxcpm
from nanovllm_voxcpm import VoxCPM
import numpy as np, soundfile as sf

server = VoxCPM.from_pretrained(model="/path/to/VoxCPM", devices=[0])
chunks = list(server.generate(target_text="Hello from VoxCPM!"))
sf.write("out.wav", np.concatenate(chunks), 48000)
server.stop()
RTF as low as ~0.13 on NVIDIA RTX 4090 (vs ~0.3 with the standard PyTorch implementation), with support for batched concurrent requests and a FastAPI HTTP server. See the Nano-vLLM-VoxCPM repo for deployment details.
Full parameter reference, multi-scenario examples, and voice cloning tips → Quick Start Guide | Usage Guide | Cookbook
📦 Models & Versions
| VoxCPM2 | VoxCPM1.5 | VoxCPM-0.5B | |
|---|---|---|---|
| Status | 🟢 Latest | Stable | Legacy |
| Backbone Parameters | 2B | 0.6B | 0.5B |
| Audio Sample Rate | 48kHz | 44.1kHz | 16kHz |
| LM Token Rate | 6.25Hz | 6.25Hz | 12.5Hz |
| Languages | 30 | 2 (zh, en) | 2 (zh, en) |
| Cloning Mode | Isolated Reference & Continuation | Continuation only | Continuation only |
| Voice Design | ✅ | — | — |
| Controllable Voice Cloning | ✅ | — | — |
| SFT / LoRA | ✅ | ✅ | ✅ |
| RTF (RTX 4090) | ~0.30 | ~0.15 | ~0.17 |
| RTF in Nano-VLLM (RTX 4090) | ~0.13 | ~0.08 | ~0.10 |
| VRAM | ~8 GB | ~6 GB | ~5 GB |
| Weights | 🤗 HF / MS | 🤗 HF / MS | 🤗 HF / MS |
| Technical Report | Coming soon | — | arXiv ICLR 2026 |
| Demo Page | Audio Samples | — | Audio Samples |
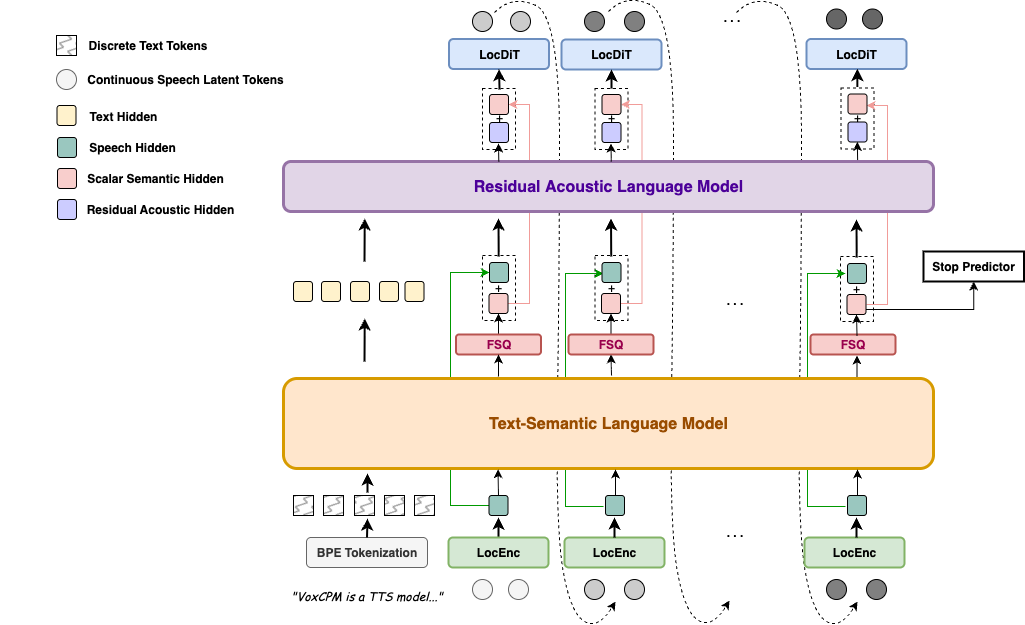
VoxCPM2 is built on a tokenizer-free, diffusion autoregressive paradigm. The model operates entirely in the latent space of AudioVAE V2, following a four-stage pipeline: LocEnc → TSLM → RALM → LocDiT, enabling rich expressiveness and 48kHz native audio output.
For full architectural details, VoxCPM2-specific upgrades, and a model comparison table, see the Architecture Design.
📊 Performance
VoxCPM2 achieves state-of-the-art or comparable results on public zero-shot and controllable TTS benchmarks.
Seed-TTS-eval
Seed-TTS-eval WER(⬇)&SIM(⬆) Results (click to expand)
| Model | Parameters | Open-Source | test-EN | test-ZH | test-Hard | |||
|---|---|---|---|---|---|---|---|---|
| WER/%⬇ | SIM/%⬆ | CER/%⬇ | SIM/%⬆ | CER/%⬇ | SIM/%⬆ | |||
| MegaTTS3 | 0.5B | ❌ | 2.79 | 77.1 | 1.52 | 79.0 | - | - |
| DiTAR | 0.6B | ❌ | 1.69 | 73.5 | 1.02 | 75.3 | - | - |
| CosyVoice3 | 0.5B | ❌ | 2.02 | 71.8 | 1.16 | 78.0 | 6.08 | 75.8 |
| CosyVoice3 | 1.5B | ❌ | 2.22 | 72.0 | 1.12 | 78.1 | 5.83 | 75.8 |
| Seed-TTS | - | ❌ | 2.25 | 76.2 | 1.12 | 79.6 | 7.59 | 77.6 |
| MiniMax-Speech | - | ❌ | 1.65 | 69.2 | 0.83 | 78.3 | - | - |
| F5-TTS | 0.3B | ✅ | 2.00 | 67.0 | 1.53 | 76.0 | 8.67 | 71.3 |
| MaskGCT | 1B | ✅ | 2.62 | 71.7 | 2.27 | 77.4 | - | - |
| CosyVoice | 0.3B | ✅ | 4.29 | 60.9 | 3.63 | 72.3 | 11.75 | 70.9 |
| CosyVoice2 | 0.5B | ✅ | 3.09 | 65.9 | 1.38 | 75.7 | 6.83 | 72.4 |
| SparkTTS | 0.5B | ✅ | 3.14 | 57.3 | 1.54 | 66.0 | - | - |
| FireRedTTS | 0.5B | ✅ | 3.82 | 46.0 | 1.51 | 63.5 | 17.45 | 62.1 |
| FireRedTTS-2 | 1.5B | ✅ | 1.95 | 66.5 | 1.14 | 73.6 | - | - |
| Qwen2.5-Omni | 7B | ✅ | 2.72 | 63.2 | 1.70 | 75.2 | 7.97 | 74.7 |
| Qwen3-Omni | 30B-A3B | ✅ | 1.39 | - | 1.07 | - | - | - |
| OpenAudio-s1-mini | 0.5B | ✅ | 1.94 | 55.0 | 1.18 | 68.5 | 23.37 | 64.3 |
| IndexTTS2 | 1.5B | ✅ | 2.23 | 70.6 | 1.03 | 76.5 | 7.12 | 75.5 |
| VibeVoice | 1.5B | ✅ | 3.04 | 68.9 | 1.16 | 74.4 | - | - |
| HiggsAudio-v2 | 3B | ✅ | 2.44 | 67.7 | 1.50 | 74.0 | 55.07 | 65.6 |
| VoxCPM-0.5B | 0.6B | ✅ | 1.85 | 72.9 | 0.93 | 77.2 | 8.87 | 73.0 |
| VoxCPM1.5 | 0.8B | ✅ | 2.12 | 71.4 | 1.18 | 77.0 | 7.74 | 73.1 |
| MOSS-TTS | ✅ | 1.85 | 73.4 | 1.20 | 78.8 | - | - | |
| Qwen3-TTS | 1.7B | ✅ | 1.23 | 71.7 | 1.22 | 77.0 | 6.76 | 74.8 |
| FishAudio S2 | 4B | ✅ | 0.99 | - | 0.54 | - | 5.99 | - |
| LongCat-Audio-DiT | 3.5B | ✅ | 1.50 | 78.6 | 1.09 | 81.8 | 6.04 | 79.7 |
| VoxCPM2 | 2B | ✅ | 1.84 | 75.3 | 0.97 | 79.5 | 8.13 | 75.3 |
CV3-eval
CV3-eval Multilingual WER/CER(⬇) Results (click to expand)
| Model | zh | en | hard-zh | hard-en | ja | ko | de | es | fr | it | ru |
|---|---|---|---|---|---|---|---|---|---|---|---|
| CosyVoice2 | 4.08 | 6.32 | 12.58 | 11.96 | 9.13 | 19.7 | - | - | - | - | - |
| CosyVoice3-1.5B | 3.91 | 4.99 | 9.77 | 10.55 | 7.57 | 5.69 | 6.43 | 4.47 | 11.8 | 10.5 | 6.64 |
| Fish Audio S2 | 2.65 | 2.43 | 9.10 | 4.40 | 3.96 | 2.76 | 2.22 | 2.00 | 6.26 | 2.04 | 2.78 |
| VoxCPM2 | 3.65 | 5.00 | 8.55 | 8.48 | 5.96 | 5.69 | 4.77 | 3.80 | 9.85 | 4.25 | 5.21 |
MiniMax-Multilingual-Test
Minimax-MLS-test WER(⬇) Results (click to expand)
| Language | Minimax | ElevenLabs | Qwen3-TTS | FishAudio S2 | VoxCPM2 |
|---|---|---|---|---|---|
| Arabic | 1.665 | 1.666 | – | 3.500 | 13.046 |
| Cantonese | 34.111 | 51.513 | – | 30.670 | 38.584 |
| Chinese | 2.252 | 16.026 | 0.928 | 0.730 | 1.136 |
| Czech | 3.875 | 2.108 | – | 2.840 | 24.132 |
| Dutch | 1.143 | 0.803 | – | 0.990 | 0.913 |
| English | 2.164 | 2.339 | 0.934 | 1.620 | 2.289 |
| Finnish | 4.666 | 2.964 | – | 3.330 | 2.632 |
| French | 4.099 | 5.216 | 2.858 | 3.050 | 4.534 |
| German | 1.906 | 0.572 | 1.235 | 0.550 | 0.679 |
| Greek | 2.016 | 0.991 | – | 5.740 | 2.844 |
| Hindi | 6.962 | 5.827 | – | 14.640 | 19.699 |
| Indonesian | 1.237 | 1.059 | – | 1.460 | 1.084 |
| Italian | 1.543 | 1.743 | 0.948 | 1.270 | 1.563 |
| Japanese | 3.519 | 10.646 | 3.823 | 2.760 | 4.628 |
| Korean | 1.747 | 1.865 | 1.755 | 1.180 | 1.962 |
| Polish | 1.415 | 0.766 | – | 1.260 | 1.141 |
| Portuguese | 1.877 | 1.331 | 1.526 | 1.140 | 1.938 |
| Romanian | 2.878 | 1.347 | – | 10.740 | 21.577 |
| Russian | 4.281 | 3.878 | 3.212 | 2.400 | 3.634 |
| Spanish | 1.029 | 1.084 | 1.126 | 0.910 | 1.438 |
| Thai | 2.701 | 73.936 | – | 4.230 | 2.961 |
| Turkish | 1.52 | 0.699 | – | 0.870 | 0.817 |
| Ukrainian | 1.082 | 0.997 | – | 2.300 | 6.316 |
| Vietnamese | 0.88 | 73.415 | – | 7.410 | 3.307 |
Minimax-MLS-test SIM(⬆) Results (click to expand)
| Language | Minimax | ElevenLabs | Qwen3-TTS | FishAudio S2 | VoxCPM2 |
|---|---|---|---|---|---|
| Arabic | 73.6 | 70.6 | – | 75.0 | 79.1 |
| Cantonese | 77.8 | 67.0 | – | 80.5 | 83.5 |
| Chinese | 78.0 | 67.7 | 79.9 | 81.6 | 82.5 |
| Czech | 79.6 | 68.5 | – | 79.8 | 78.3 |
| Dutch | 73.8 | 68.0 | – | 73.0 | 80.8 |
| English | 75.6 | 61.3 | 77.5 | 79.7 | 85.4 |
| Finnish | 83.5 | 75.9 | – | 81.9 | 89.0 |
| French | 62.8 | 53.5 | 62.8 | 69.8 | 73.5 |
| German | 73.3 | 61.4 | 77.5 | 76.7 | 80.3 |
| Greek | 82.6 | 73.3 | – | 79.5 | 86.0 |
| Hindi | 81.8 | 73.0 | – | 82.1 | 85.6 |
| Indonesian | 72.9 | 66.0 | – | 76.3 | 80.0 |
| Italian | 69.9 | 57.9 | 81.7 | 74.7 | 78.0 |
| Japanese | 77.6 | 73.8 | 78.8 | 79.6 | 82.8 |
| Korean | 77.6 | 70.0 | 79.9 | 81.7 | 83.3 |
| Polish | 80.2 | 72.9 | – | 81.9 | 88.4 |
| Portuguese | 80.5 | 71.1 | 81.7 | 78.1 | 83.7 |
| Romanian | 80.9 | 69.9 | – | 73.3 | 79.7 |
| Russian | 76.1 | 67.6 | 79.2 | 79.0 | 81.1 |
| Spanish | 76.2 | 61.5 | 81.4 | 77.6 | 83.1 |
| Thai | 80.0 | 58.8 | – | 78.6 | 84.0 |
| Turkish | 77.9 | 59.6 | – | 83.5 | 87.1 |
| Ukrainian | 73.0 | 64.7 | – | 74.7 | 79.8 |
| Vietnamese | 74.3 | 36.9 | – | 74.0 | 80.6 |
Internal 30-Language ASR Benchmark
We additionally run an internal multilingual intelligibility benchmark with 30 languages × 500 samples. ASR transcription is evaluated via Gemini 3.1 Flash Lite API.
Internal 30-Language ASR Benchmark (click to expand)
| Language | Metric | VoxCPM2 | Fish S2-Pro |
|---|---|---|---|
| ar (Arabic) | CER | 1.23% | 0.30% |
| da (Danish) | WER | 2.70% | 3.52% |
| de (German) | WER | 0.96% | 0.64% |
| el (Greek) | WER | 3.17% | 4.61% |
| en (English) | WER | 0.42% | 1.03% |
| es (Spanish) | WER | 1.33% | 0.64% |
| fi (Finnish) | WER | 2.24% | 2.80% |
| fr (French) | WER | 2.16% | 2.34% |
| he (Hebrew) | CER | 2.98% | 15.27% |
| hi (Hindi) | CER | 0.79% | 0.91% |
| id (Indonesian) | WER | 1.36% | 1.68% |
| it (Italian) | WER | 1.65% | 1.08% |
| ja (Japanese) | CER | 2.40% | 1.82% |
| km (Khmer) | CER | 2.05% | 75.15% |
| ko (Korean) | CER | 0.95% | 0.29% |
| lo (Lao) | CER | 1.90% | 87.40% |
| ms (Malay) | WER | 1.75% | 1.41% |
| my (Burmese) | CER | 1.42% | 85.27% |
| nl (Dutch) | WER | 1.25% | 1.68% |
| no (Norwegian) | WER | 2.49% | 3.76% |
| pl (Polish) | WER | 1.90% | 1.65% |
| pt (Portuguese) | WER | 1.48% | 1.49% |
| ru (Russian) | WER | 0.90% | 0.86% |
| sv (Swedish) | WER | 2.22% | 2.63% |
| sw (Swahili) | CER | 1.07% | 2.02% |
| th (Thai) | CER | 0.94% | 1.92% |
| tl (Tagalog) | WER | 2.63% | 4.00% |
| tr (Turkish) | WER | 1.65% | 1.65% |
| vi (Vietnamese) | WER | 1.56% | 5.56% |
| zh (Chinese) | CER | 0.92% | 1.02% |
| Average (30 languages) | 1.68% | - |
InstructTTSEval
Instruction-Guided Voice Design Results (click to expand)
| Model | InstructTTSEval-ZH | InstructTTSEval-EN | ||||
|---|---|---|---|---|---|---|
| APS⬆ | DSD⬆ | RP⬆ | APS⬆ | DSD⬆ | RP⬆ | |
| Hume | – | – | – | 83.0 | 75.3 | 54.3 |
| VoxInstruct | 47.5 | 52.3 | 42.6 | 54.9 | 57.0 | 39.3 |
| Parler-tts-mini | – | – | – | 63.4 | 48.7 | 28.6 |
| Parler-tts-large | – | – | – | 60.0 | 45.9 | 31.2 |
| PromptTTS | – | – | – | 64.3 | 47.2 | 31.4 |
| PromptStyle | – | – | – | 57.4 | 46.4 | 30.9 |
| VoiceSculptor | 75.7 | 64.7 | 61.5 | – | – | – |
| Mimo-Audio-7B-Instruct | 75.7 | 74.3 | 61.5 | 80.6 | 77.6 | 59.5 |
| Qwen3TTS-12Hz-1.7B-VD | 85.2 | 81.1 | 65.1 | 82.9 | 82.4 | 68.4 |
| VoxCPM2 | 85.2 | 71.5 | 60.8 | 84.2 | 83.2 | 71.4 |
⚙️ Fine-tuning
VoxCPM supports both full fine-tuning (SFT) and LoRA fine-tuning. With as little as 5–10 minutes of audio, you can adapt to a specific speaker, language, or domain.
# LoRA fine-tuning (parameter-efficient, recommended)
python scripts/train_voxcpm_finetune.py \
    --config_path conf/voxcpm_v2/voxcpm_finetune_lora.yaml

# Full fine-tuning
python scripts/train_voxcpm_finetune.py \
    --config_path conf/voxcpm_v2/voxcpm_finetune_all.yaml

# WebUI for training & inference
python lora_ft_webui.py   # then open http://localhost:7860
Full guide → Fine-tuning Guide (data preparation, configuration, training, LoRA hot-swapping, FAQ)
📚 Documentation
Full documentation: voxcpm.readthedocs.io
| Topic | Link |
|---|---|
| Quick Start & Installation | Quick Start |
| Usage Guide & Cookbook | User Guide |
| VoxCPM Series | Models |
| Fine-tuning (SFT & LoRA) | Fine-tuning Guide |
| FAQ & Troubleshooting | FAQ |
🌟 Ecosystem & Community
| Project | Description |
|---|---|
| Nano-vLLM | High-throughput and Fast GPU serving |
| VoxCPM.cpp | GGML/GGUF: CPU, CUDA, Vulkan inference |
| VoxCPM-ONNX | ONNX export for CPU inference |
| VoxCPMANE | Apple Neural Engine backend |
| voxcpm_rs | Rust re-implementation |
| ComfyUI-VoxCPM | ComfyUI node-based workflows |
| ComfyUI-VoxCPMTTS | ComfyUI TTS extension |
| TTS WebUI | Browser-based TTS extension |
See the full Ecosystem in the docs. Community projects are not officially maintained by OpenBMB. Built something cool? Open an issue or PR to add it!
⚠️ Risks and Limitations
- Potential for Misuse: VoxCPM's voice cloning can generate highly realistic synthetic speech. It is strictly forbidden to use VoxCPM for impersonation, fraud, or disinformation. We strongly recommend clearly marking any AI-generated content.
- Controllable Generation Stability: Voice Design and Controllable Voice Cloning results can vary between runs — you may try to generate 1~3 times to obtain the desired voice or style. We are actively working on improving controllability consistency.
- Language Coverage: VoxCPM2 officially supports 30 languages. For languages not on the list, you are welcome to test directly or try fine-tuning on your own data. We plan to expand language coverage in future releases.
- Usage: This model is released under the Apache-2.0 license. For production deployments, we recommend conducting thorough testing and safety evaluation tailored to your use case.
📖 Citation
If you find VoxCPM helpful, please consider citing our work and starring ⭐ the repository!
@article{voxcpm2_2026,
  title   = {VoxCPM2: Tokenizer-Free TTS for Multilingual Speech Generation, Creative Voice Design, and True-to-Life Cloning},
  author  = {VoxCPM Team},
  journal = {GitHub},
  year    = {2026},
}

@article{voxcpm2025,
  title   = {VoxCPM: Tokenizer-Free TTS for Context-Aware Speech Generation
             and True-to-Life Voice Cloning},
  author  = {Zhou, Yixuan and Zeng, Guoyang and Liu, Xin and Li, Xiang and
             Yu, Renjie and Wang, Ziyang and Ye, Runchuan and Sun, Weiyue and
             Gui, Jiancheng and Li, Kehan and Wu, Zhiyong and Liu, Zhiyuan},
  journal = {arXiv preprint arXiv:2509.24650},
  year    = {2025},
}
📄 License
VoxCPM model weights and code are open-sourced under the Apache-2.0 license.
🙏 Acknowledgments
- DiTAR for the diffusion autoregressive backbone
- MiniCPM-4 for the language model foundation
- CosyVoice for the Flow Matching-based LocDiT implementation
- DAC for the Audio VAE backbone
- Our community users for trying VoxCPM, reporting issues, sharing ideas, and contributing—your support helps the project keep getting better
Institutions
⭐ Star History
The first open-source harness builder for AI coding. Make AI coding deterministic and repeatable.
![]()
Archon
The first open-source harness builder for AI coding. Make AI coding deterministic and repeatable.
![]()
![]()
Archon is a workflow engine for AI coding agents. Define your development processes as YAML workflows - planning, implementation, validation, code review, PR creation - and run them reliably across all your projects.
Like what Dockerfiles did for infrastructure and GitHub Actions did for CI/CD - Archon does for AI coding workflows. Think n8n, but for software development.
Why Archon?
When you ask an AI agent to "fix this bug", what happens depends on the model's mood. It might skip planning. It might forget to run tests. It might write a PR description that ignores your template. Every run is different.
Archon fixes this. Encode your development process as a workflow. The workflow defines the phases, validation gates, and artifacts. The AI fills in the intelligence at each step, but the structure is deterministic and owned by you.
- Repeatable - Same workflow, same sequence, every time. Plan, implement, validate, review, PR.
- Isolated - Every workflow run gets its own git worktree. Run 5 fixes in parallel with no conflicts.
- Fire and forget - Kick off a workflow, go do other work. Come back to a finished PR with review comments.
- Composable - Mix deterministic nodes (bash scripts, tests, git ops) with AI nodes (planning, code generation, review). The AI only runs where it adds value.
- Portable - Define workflows once in
.archon/workflows/, commit them to your repo. They work the same from CLI, Web UI, Slack, Telegram, or GitHub.
What It Looks Like
Here's an example of an Archon workflow that plans, implements in a loop until tests pass, gets your approval, then creates the PR:
# .archon/workflows/build-feature.yaml
nodes:
  - id: plan
    prompt: "Explore the codebase and create an implementation plan"

  - id: implement
    depends_on: [plan]
    loop:                                      # AI loop - iterate until done
      prompt: "Read the plan. Implement the next task. Run validation."
      until: ALL_TASKS_COMPLETE
      fresh_context: true                      # Fresh session each iteration

  - id: run-tests
    depends_on: [implement]
    bash: "bun run validate"                   # Deterministic - no AI

  - id: review
    depends_on: [run-tests]
    prompt: "Review all changes against the plan. Fix any issues."

  - id: approve
    depends_on: [review]
    loop:                                      # Human approval gate
      prompt: "Present the changes for review. Address any feedback."
      until: APPROVED
      interactive: true                        # Pauses and waits for human input

  - id: create-pr
    depends_on: [approve]
    prompt: "Push changes and create a pull request"
Tell your coding agent what you want, and Archon handles the rest:
You: Use archon to add dark mode to the settings page

Agent: I'll run the archon-idea-to-pr workflow for this.
       → Creating isolated worktree on branch archon/task-dark-mode...
       → Planning...
       → Implementing (task 1/4)...
       → Implementing (task 2/4)...
       → Tests failing - iterating...
       → Tests passing after 2 iterations
       → Code review complete - 0 issues
       → PR ready: https://github.com/you/project/pull/47
Previous Version
Looking for the original Python-based Archon (task management + RAG)? It's fully preserved on the archive/v1-task-management-rag branch.
Getting Started
Most users should start with the Full Setup - it walks you through credentials, installs the Archon skill into your projects, and gives you the web dashboard.
Already have Claude Code and just want the CLI? Jump to the Quick Install.
Full Setup (5 minutes)
Clone the repo and use the guided setup wizard. This configures credentials, platform integrations, and copies the Archon skill into your target projects.
Prerequisites - Bun, Claude Code, and the GitHub CLI
Bun - bun.sh
# macOS/Linux
curl -fsSL https://bun.sh/install | bash

# Windows (PowerShell)
irm bun.sh/install.ps1 | iex
GitHub CLI - cli.github.com
# macOS
brew install gh

# Windows (via winget)
winget install GitHub.cli

# Linux (Debian/Ubuntu)
sudo apt install gh
Claude Code - claude.ai/code
# macOS/Linux/WSL
curl -fsSL https://claude.ai/install.sh | bash

# Windows (PowerShell)
irm https://claude.ai/install.ps1 | iex
git clone https://github.com/coleam00/Archon
cd Archon
bun install
claude
Then say: "Set up Archon"
The setup wizard walks you through everything: CLI installation, authentication, platform selection, and copies the Archon skill to your target repo.
Quick Install (30 seconds)
Already have Claude Code set up? Install the standalone CLI binary and skip the wizard.
macOS / Linux
curl -fsSL https://archon.diy/install | bash
Windows (PowerShell)
irm https://archon.diy/install.ps1 | iex
Homebrew
brew install coleam00/archon/archon
Start Using Archon
Once you've completed either setup path, go to your project and start working:
cd /path/to/your/project
claude
Use archon to fix issue #42
What archon workflows do I have? When would I use each one?
The coding agent handles workflow selection, branch naming, and worktree isolation for you. Projects are registered automatically the first time they're used.
Important: Always run Claude Code from your target repo, not from the Archon repo. The setup wizard copies the Archon skill into your project so it works from there.
Web UI
Archon includes a web dashboard for chatting with your coding agent, running workflows, and monitoring activity. To start it, ask your coding agent to run the frontend from the Archon repo, or run bun run dev from the repo root yourself.
Register a project by clicking + next to "Project" in the chat sidebar - enter a GitHub URL or local path. Then start a conversation, invoke workflows, and watch progress in real time.
Key pages:
- Chat - Conversation interface with real-time streaming and tool call visualization
- Dashboard - Mission Control for monitoring running workflows, with filterable history by project, status, and date
- Workflow Builder - Visual drag-and-drop editor for creating DAG workflows with loop nodes
- Workflow Execution - Step-by-step progress view for any running or completed workflow
Monitoring hub: The sidebar shows conversations from all platforms - not just the web. Workflows kicked off from the CLI, messages from Slack or Telegram, GitHub issue interactions - everything appears in one place.
See the Web UI Guide for full documentation.
What Can You Automate?
Archon ships with workflows for common development tasks:
| Workflow | What it does |
|---|---|
archon-assist |
General Q&A, debugging, exploration - full Claude Code agent with all tools |
archon-fix-github-issue |
Classify issue → investigate/plan → implement → validate → PR → smart review → self-fix |
archon-idea-to-pr |
Feature idea → plan → implement → validate → PR → 5 parallel reviews → self-fix |
archon-plan-to-pr |
Execute existing plan → implement → validate → PR → review → self-fix |
archon-issue-review-full |
Comprehensive fix + full multi-agent review pipeline for GitHub issues |
archon-smart-pr-review |
Classify PR complexity → run targeted review agents → synthesize findings |
archon-comprehensive-pr-review |
Multi-agent PR review (5 parallel reviewers) with automatic fixes |
archon-create-issue |
Classify problem → gather context → investigate → create GitHub issue |
archon-validate-pr |
Thorough PR validation testing both main and feature branches |
archon-resolve-conflicts |
Detect merge conflicts → analyze both sides → resolve → validate → commit |
archon-feature-development |
Implement feature from plan → validate → create PR |
archon-architect |
Architectural sweep, complexity reduction, codebase health improvement |
archon-refactor-safely |
Safe refactoring with type-check hooks and behavior verification |
archon-ralph-dag |
PRD implementation loop - iterate through stories until done |
archon-remotion-generate |
Generate or modify Remotion video compositions with AI |
archon-test-loop-dag |
Loop node test workflow - iterative counter until completion |
archon-piv-loop |
Guided Plan-Implement-Validate loop with human review between iterations |
Archon ships 17 default workflows - run archon workflow list or describe what you want and the router picks the right one.
Or define your own. Default workflows are great starting points - copy one from .archon/workflows/defaults/ and customize it. Workflows are YAML files in .archon/workflows/, commands are markdown files in .archon/commands/. Same-named files in your repo override the bundled defaults. Commit them - your whole team runs the same process.
See Authoring Workflows and Authoring Commands.
Add a Platform
The Web UI and CLI work out of the box. Optionally connect a chat platform for remote access:
| Platform | Setup time | Guide |
|---|---|---|
| Telegram | 5 min | Telegram Guide |
| Slack | 15 min | Slack Guide |
| GitHub Webhooks | 15 min | GitHub Guide |
| Discord | 5 min | Discord Guide |
Architecture
┌─────────────────────────────────────────────────────────┐
│  Platform Adapters (Web UI, CLI, Telegram, Slack,       │
│                    Discord, GitHub)                      │
└──────────────────────────┬──────────────────────────────┘
                           │
                           ▼
┌─────────────────────────────────────────────────────────┐
│                     Orchestrator                        │
│          (Message Routing & Context Management)         │
└─────────────┬───────────────────────────┬───────────────┘
              │                           │
      ┌───────┴────────┐          ┌───────┴────────┐
      │                │          │                │
      ▼                ▼          ▼                ▼
┌───────────┐  ┌────────────┐  ┌──────────────────────────┐
│  Command  │  │  Workflow  │  │    AI Assistant Clients  │
│  Handler  │  │  Executor  │  │      (Claude / Codex)    │
│  (Slash)  │  │  (YAML)    │  │                          │
└───────────┘  └────────────┘  └──────────────────────────┘
      │              │                      │
      └──────────────┴──────────────────────┘
                           │
                           ▼
┌─────────────────────────────────────────────────────────┐
│              SQLite / PostgreSQL (7 Tables)             │
│   Codebases • Conversations • Sessions • Workflow Runs  │
│    Isolation Environments • Messages • Workflow Events  │
└─────────────────────────────────────────────────────────┘
Documentation
Full documentation is available at archon.diy.
| Topic | Description |
|---|---|
| Getting Started | Setup guide (Web UI or CLI) |
| The Book of Archon | 10-chapter narrative tutorial |
| CLI Reference | Full CLI reference |
| Authoring Workflows | Create custom YAML workflows |
| Authoring Commands | Create reusable AI commands |
| Configuration | All config options, env vars, YAML settings |
| AI Assistants | Claude and Codex setup details |
| Deployment | Docker, VPS, production setup |
| Architecture | System design and internals |
| Troubleshooting | Common issues and fixes |
Contributing
Contributions welcome! See the open issues for things to work on.
Please read CONTRIBUTING.md before submitting a pull request.
License
Kronos: A Foundation Model for the Language of Financial Markets
Kronos: A Foundation Model for the Language of Financial Markets


![]()
Kronos is the first open-source foundation model for financial candlesticks (K-lines), trained on data from over 45 global exchanges.
📰 News
- 🚩 [2025.11.10] Kronos has been accpeted by AAAI 2026.
- 🚩 [2025.08.17] We have released the scripts for fine-tuning! Check them out to adapt Kronos to your own tasks.
- 🚩 [2025.08.02] Our paper is now available on arXiv!
📜 Introduction
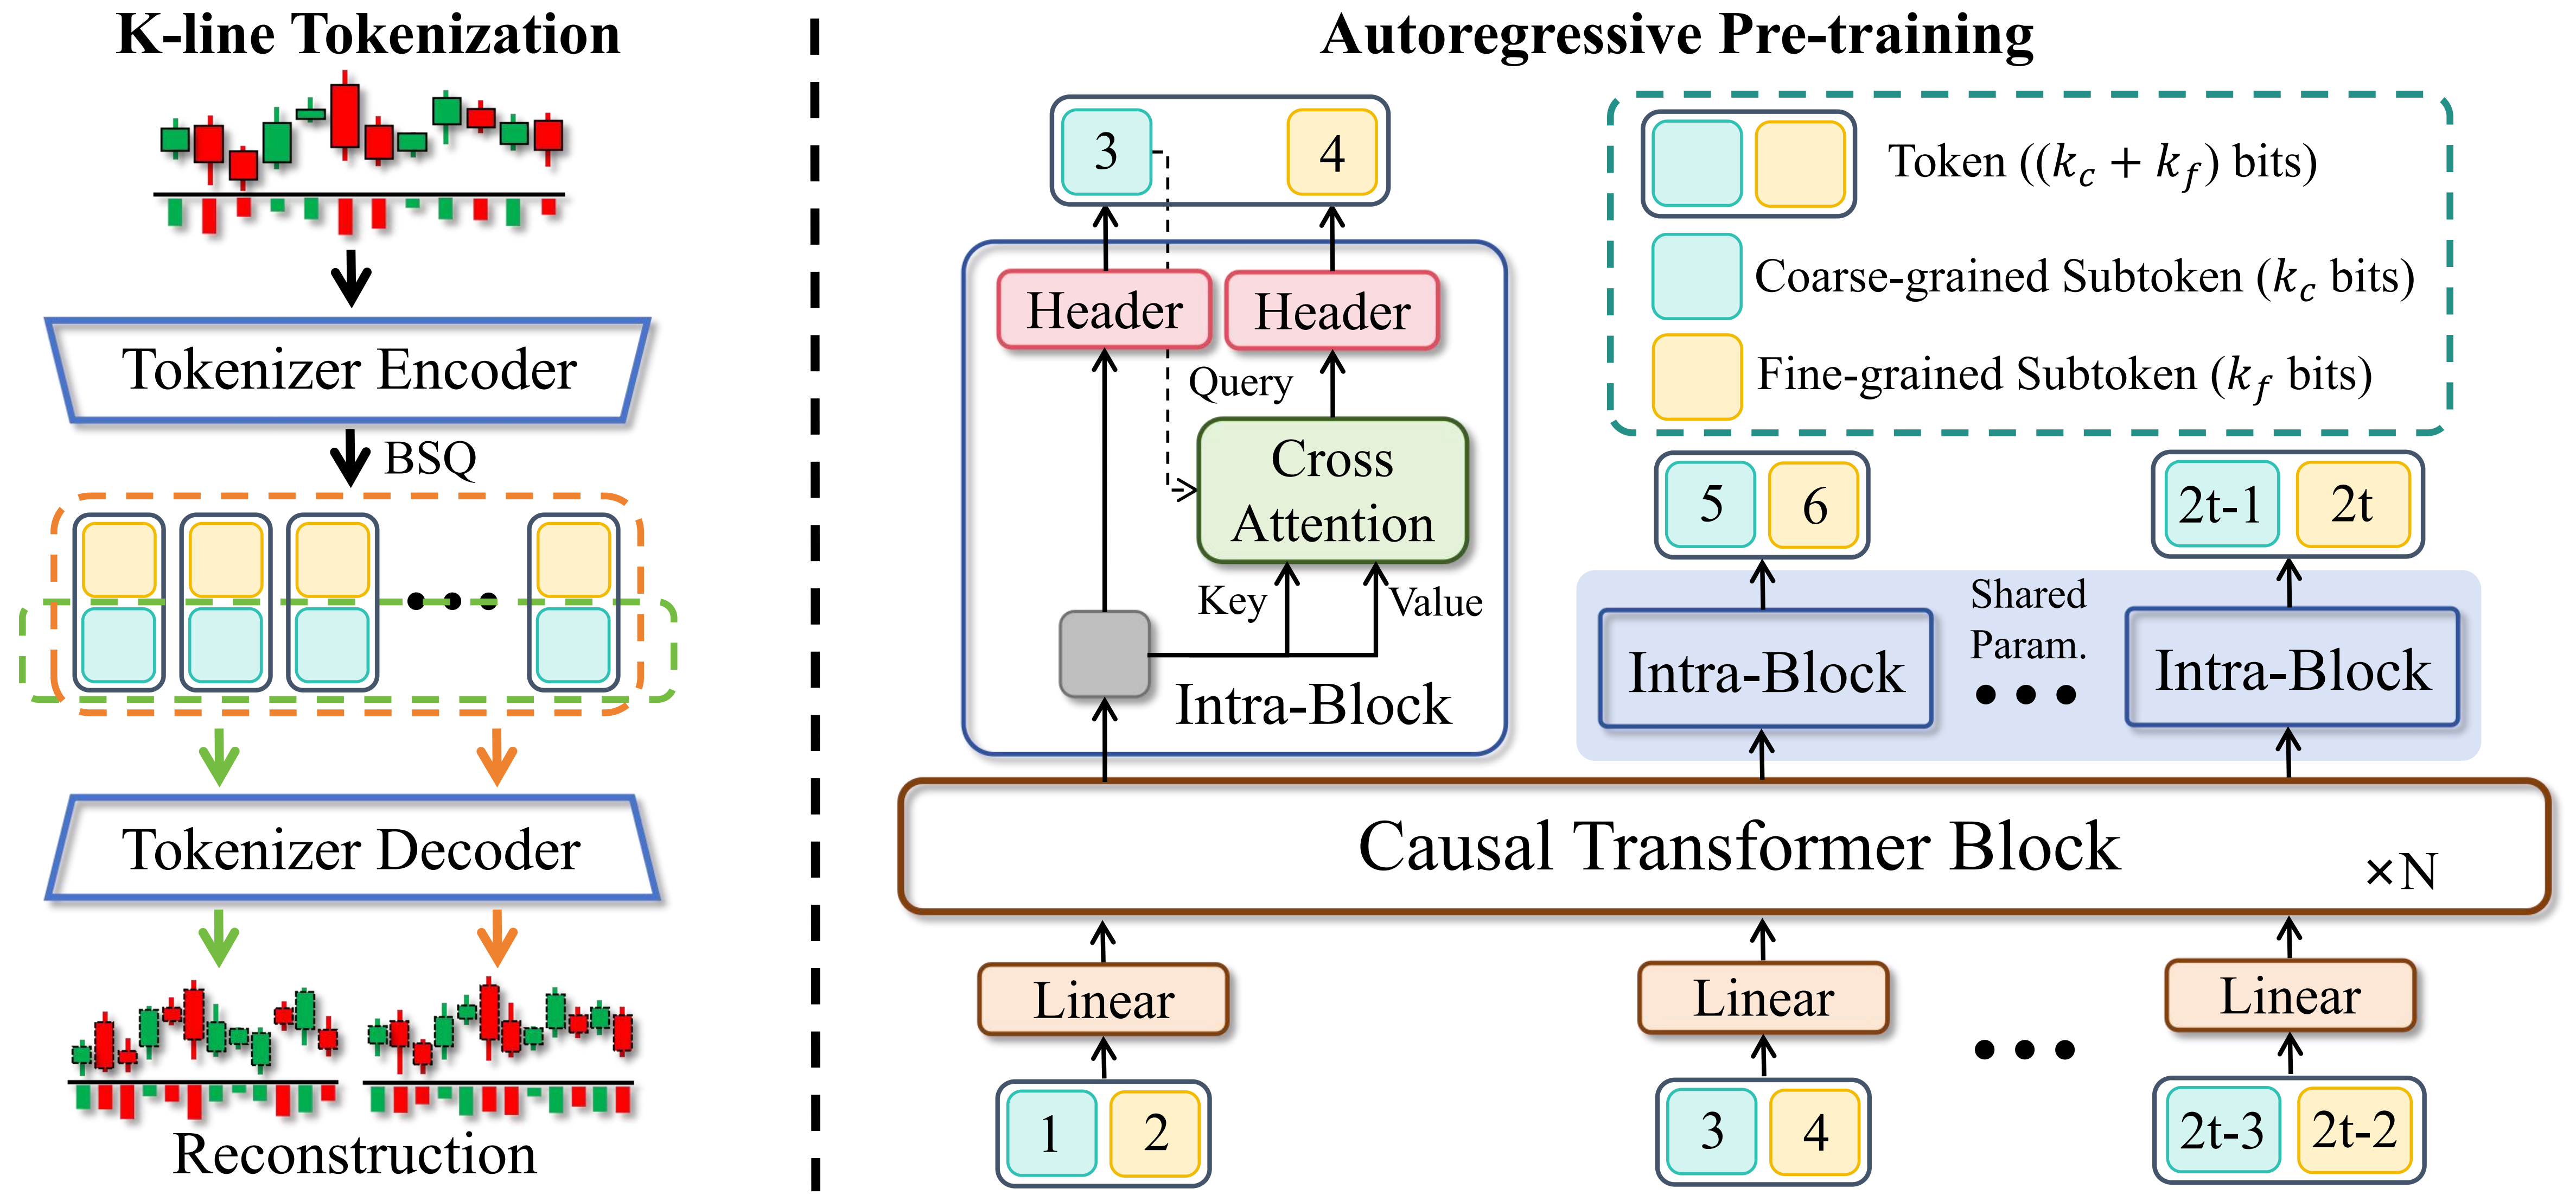
Kronos is a family of decoder-only foundation models, pre-trained specifically for the "language" of financial markets—K-line sequences. Unlike general-purpose TSFMs, Kronos is designed to handle the unique, high-noise characteristics of financial data. It leverages a novel two-stage framework:
- A specialized tokenizer first quantizes continuous, multi-dimensional K-line data (OHLCV) into hierarchical discrete tokens.
- A large, autoregressive Transformer is then pre-trained on these tokens, enabling it to serve as a unified model for diverse quantitative tasks.
✨ Live Demo
We have set up a live demo to visualize Kronos's forecasting results. The webpage showcases a forecast for the BTC/USDT trading pair over the next 24 hours.
📦 Model Zoo
We release a family of pre-trained models with varying capacities to suit different computational and application needs. All models are readily accessible from the Hugging Face Hub.
| Model | Tokenizer | Context length | Params | Open-source |
|---|---|---|---|---|
| Kronos-mini | Kronos-Tokenizer-2k | 2048 | 4.1M | ✅ NeoQuasar/Kronos-mini |
| Kronos-small | Kronos-Tokenizer-base | 512 | 24.7M | ✅ NeoQuasar/Kronos-small |
| Kronos-base | Kronos-Tokenizer-base | 512 | 102.3M | ✅ NeoQuasar/Kronos-base |
| Kronos-large | Kronos-Tokenizer-base | 512 | 499.2M | ❌ |
🚀 Getting Started
Installation
- Install Python 3.10+, and then install the dependencies:
pip install -r requirements.txt
📈 Making Forecasts
Forecasting with Kronos is straightforward using the KronosPredictor class. It handles data preprocessing, normalization, prediction, and inverse normalization, allowing you to get from raw data to forecasts in just a few lines of code.
Important Note: The max_context for Kronos-small and Kronos-base is 512. This is the maximum sequence length the model can process. For optimal performance, it is recommended that your input data length (i.e., lookback) does not exceed this limit. The KronosPredictor will automatically handle truncation for longer contexts.
Here is a step-by-step guide to making your first forecast.
1. Load the Tokenizer and Model
First, load a pre-trained Kronos model and its corresponding tokenizer from the Hugging Face Hub.
from model import Kronos, KronosTokenizer, KronosPredictor

# Load from Hugging Face Hub
tokenizer = KronosTokenizer.from_pretrained("NeoQuasar/Kronos-Tokenizer-base")
model = Kronos.from_pretrained("NeoQuasar/Kronos-small")
2. Instantiate the Predictor
Create an instance of KronosPredictor, passing the model, tokenizer, and desired device.
# Initialize the predictor
predictor = KronosPredictor(model, tokenizer, max_context=512)
3. Prepare Input Data
The predict method requires three main inputs:
df: A pandas DataFrame containing the historical K-line data. It must include columns['open', 'high', 'low', 'close'].volumeandamountare optional.x_timestamp: A pandas Series of timestamps corresponding to the historical data indf.y_timestamp: A pandas Series of timestamps for the future periods you want to predict.
import pandas as pd

# Load your data
df = pd.read_csv("./data/XSHG_5min_600977.csv")
df['timestamps'] = pd.to_datetime(df['timestamps'])

# Define context window and prediction length
lookback = 400
pred_len = 120

# Prepare inputs for the predictor
x_df = df.loc[:lookback-1, ['open', 'high', 'low', 'close', 'volume', 'amount']]
x_timestamp = df.loc[:lookback-1, 'timestamps']
y_timestamp = df.loc[lookback:lookback+pred_len-1, 'timestamps']
4. Generate Forecasts
Call the predict method to generate forecasts. You can control the sampling process with parameters like T, top_p, and sample_count for probabilistic forecasting.
# Generate predictions
pred_df = predictor.predict(
    df=x_df,
    x_timestamp=x_timestamp,
    y_timestamp=y_timestamp,
    pred_len=pred_len,
    T=1.0,          # Temperature for sampling
    top_p=0.9,      # Nucleus sampling probability
    sample_count=1  # Number of forecast paths to generate and average
)

print("Forecasted Data Head:")
print(pred_df.head())
The predict method returns a pandas DataFrame containing the forecasted values for open, high, low, close, volume, and amount, indexed by the y_timestamp you provided.
For efficient processing of multiple time series, Kronos provides a predict_batch method that enables parallel prediction on multiple datasets simultaneously. This is particularly useful when you need to forecast multiple assets or time periods at once.
# Prepare multiple datasets for batch prediction
df_list = [df1, df2, df3]  # List of DataFrames
x_timestamp_list = [x_ts1, x_ts2, x_ts3]  # List of historical timestamps
y_timestamp_list = [y_ts1, y_ts2, y_ts3]  # List of future timestamps

# Generate batch predictions
pred_df_list = predictor.predict_batch(
    df_list=df_list,
    x_timestamp_list=x_timestamp_list,
    y_timestamp_list=y_timestamp_list,
    pred_len=pred_len,
    T=1.0,
    top_p=0.9,
    sample_count=1,
    verbose=True
)

# pred_df_list contains prediction results in the same order as input
for i, pred_df in enumerate(pred_df_list):
    print(f"Predictions for series {i}:")
    print(pred_df.head())
Important Requirements for Batch Prediction:
- All series must have the same historical length (lookback window)
- All series must have the same prediction length (
pred_len) - Each DataFrame must contain the required columns:
['open', 'high', 'low', 'close'] volumeandamountcolumns are optional and will be filled with zeros if missing
The predict_batch method leverages GPU parallelism for efficient processing and automatically handles normalization and denormalization for each series independently.
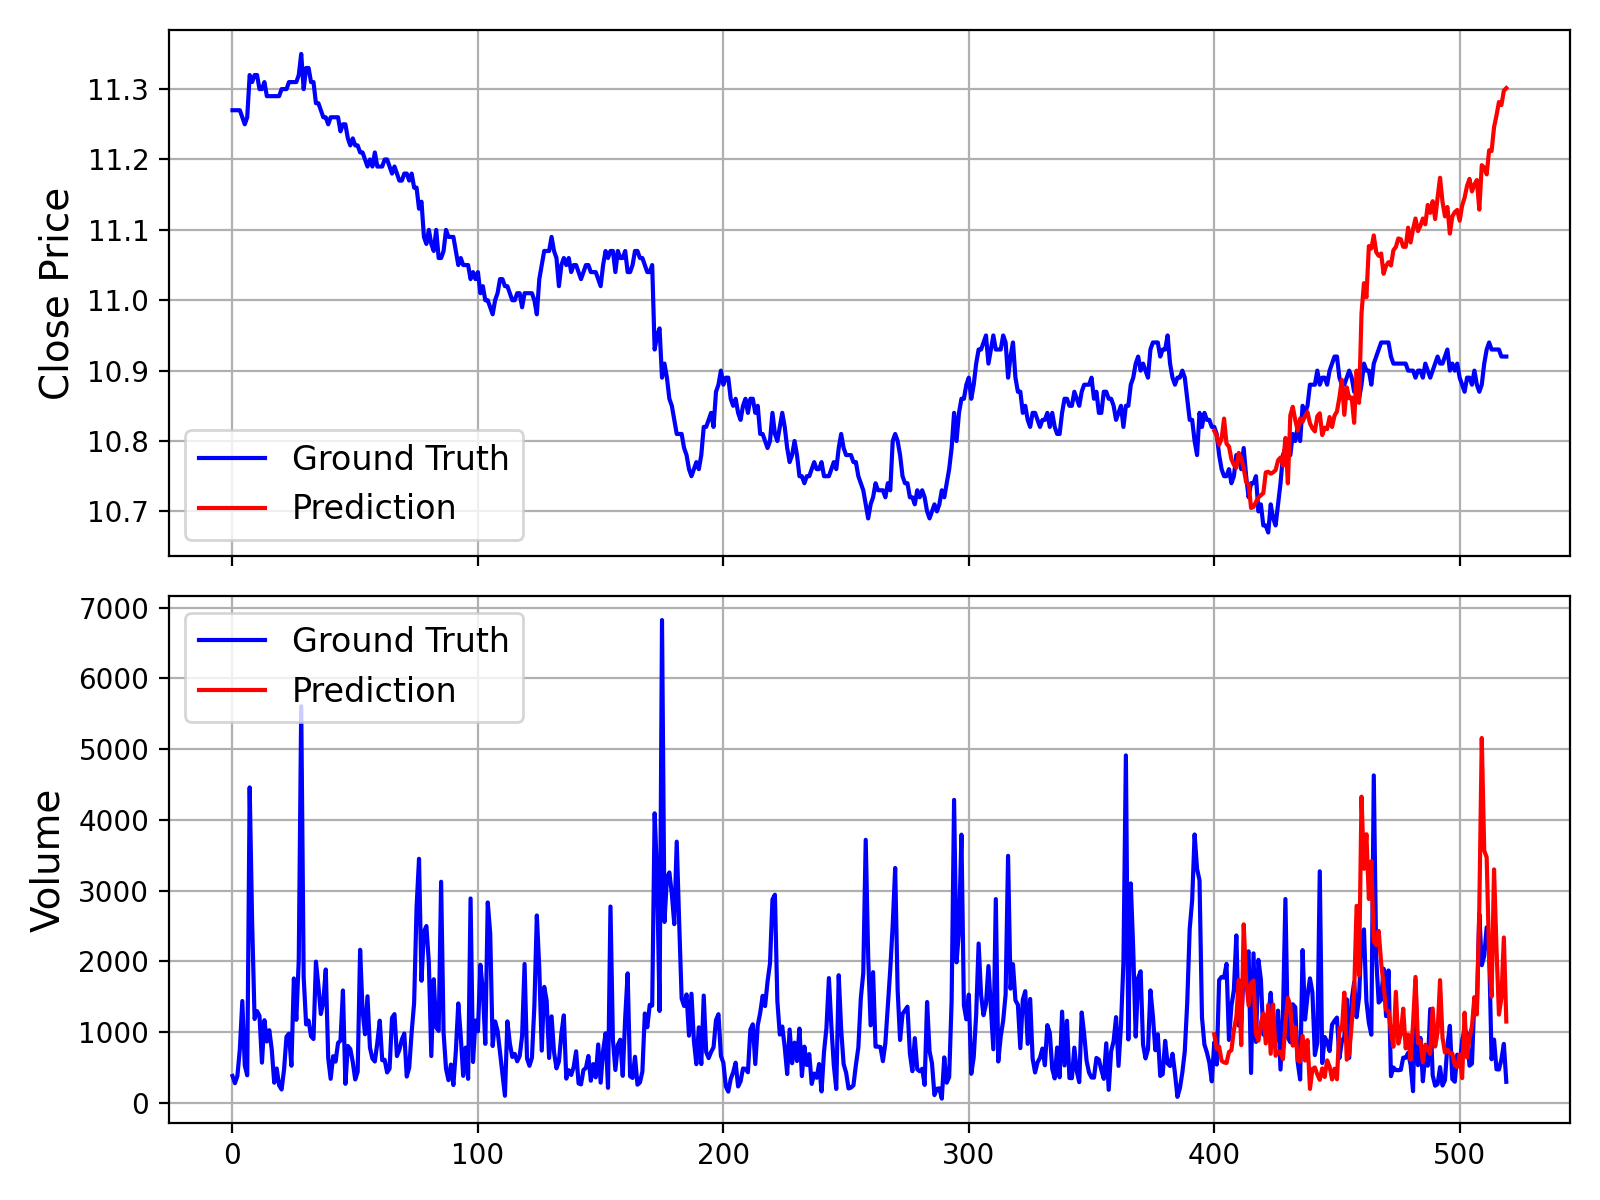
5. Example and Visualization
For a complete, runnable script that includes data loading, prediction, and plotting, please see examples/prediction_example.py.
Running this script will generate a plot comparing the ground truth data against the model's forecast, similar to the one shown below:
Additionally, we provide a script that makes predictions without Volume and Amount data, which can be found in examples/prediction_wo_vol_example.py.
🔧 Finetuning on Your Own Data (A-Share Market Example)
We provide a complete pipeline for finetuning Kronos on your own datasets. As an example, we demonstrate how to use Qlib to prepare data from the Chinese A-share market and conduct a simple backtest.
Disclaimer: This pipeline is intended as a demonstration to illustrate the finetuning process. It is a simplified example and not a production-ready quantitative trading system. A robust quantitative strategy requires more sophisticated techniques, such as portfolio optimization and risk factor neutralization, to achieve stable alpha.
The finetuning process is divided into four main steps:
- Configuration: Set up paths and hyperparameters.
- Data Preparation: Process and split your data using Qlib.
- Model Finetuning: Finetune the Tokenizer and the Predictor models.
- Backtesting: Evaluate the finetuned model's performance.
Prerequisites
- First, ensure you have all dependencies from
requirements.txtinstalled. - This pipeline relies on
qlib. Please install it:pip install pyqlib - You will need to prepare your Qlib data. Follow the official Qlib guide to download and set up your data locally. The example scripts assume you are using daily frequency data.
Step 1: Configure Your Experiment
All settings for data, training, and model paths are centralized in finetune/config.py. Before running any scripts, please modify the following paths according to your environment:
qlib_data_path: Path to your local Qlib data directory.dataset_path: Directory where the processed train/validation/test pickle files will be saved.save_path: Base directory for saving model checkpoints.backtest_result_path: Directory for saving backtesting results.pretrained_tokenizer_pathandpretrained_predictor_path: Paths to the pre-trained models you want to start from (can be local paths or Hugging Face model names).
You can also adjust other parameters like instrument, train_time_range, epochs, and batch_size to fit your specific task. If you don't use Comet.ml, set use_comet = False.
Step 2: Prepare the Dataset
Run the data preprocessing script. This script will load raw market data from your Qlib directory, process it, split it into training, validation, and test sets, and save them as pickle files.
python finetune/qlib_data_preprocess.py
After running, you will find train_data.pkl, val_data.pkl, and test_data.pkl in the directory specified by dataset_path in your config.
Step 3: Run the Finetuning
The finetuning process consists of two stages: finetuning the tokenizer and then the predictor. Both training scripts are designed for multi-GPU training using torchrun.
3.1 Finetune the Tokenizer
This step adjusts the tokenizer to the data distribution of your specific domain.
# Replace NUM_GPUS with the number of GPUs you want to use (e.g., 2)
torchrun --standalone --nproc_per_node=NUM_GPUS finetune/train_tokenizer.py
The best tokenizer checkpoint will be saved to the path configured in config.py (derived from save_path and tokenizer_save_folder_name).
3.2 Finetune the Predictor
This step finetunes the main Kronos model for the forecasting task.
# Replace NUM_GPUS with the number of GPUs you want to use (e.g., 2)
torchrun --standalone --nproc_per_node=NUM_GPUS finetune/train_predictor.py
The best predictor checkpoint will be saved to the path configured in config.py.
Step 4: Evaluate with Backtesting
Finally, run the backtesting script to evaluate your finetuned model. This script loads the models, performs inference on the test set, generates prediction signals (e.g., forecasted price change), and runs a simple top-K strategy backtest.
# Specify the GPU for inference
python finetune/qlib_test.py --device cuda:0
The script will output a detailed performance analysis in your console and generate a plot showing the cumulative return curves of your strategy against the benchmark, similar to the one below:
💡 From Demo to Production: Important Considerations
- Raw Signals vs. Pure Alpha: The signals generated by the model in this demo are raw predictions. In a real-world quantitative workflow, these signals would typically be fed into a portfolio optimization model. This model would apply constraints to neutralize exposure to common risk factors (e.g., market beta, style factors like size and value), thereby isolating the "pure alpha" and improving the strategy's robustness.
- Data Handling: The provided
QlibDatasetis an example. For different data sources or formats, you will need to adapt the data loading and preprocessing logic. - Strategy and Backtesting Complexity: The simple top-K strategy used here is a basic starting point. Production-level strategies often incorporate more complex logic for portfolio construction, dynamic position sizing, and risk management (e.g., stop-loss/take-profit rules). Furthermore, a high-fidelity backtest should meticulously model transaction costs, slippage, and market impact to provide a more accurate estimate of real-world performance.
📝 AI-Generated Comments: Please note that many of the code comments within the
finetune/directory were generated by an AI assistant (Gemini 2.5 Pro) for explanatory purposes. While they aim to be helpful, they may contain inaccuracies. We recommend treating the code itself as the definitive source of logic.
📖 Citation
If you use Kronos in your research, we would appreciate a citation to our paper:
@misc{shi2025kronos,
      title={Kronos: A Foundation Model for the Language of Financial Markets},
      author={Yu Shi and Zongliang Fu and Shuo Chen and Bohan Zhao and Wei Xu and Changshui Zhang and Jian Li},
      year={2025},
      eprint={2508.02739},
      archivePrefix={arXiv},
      primaryClass={q-fin.ST},
      url={https://arxiv.org/abs/2508.02739},
}
📜 License
This project is licensed under the MIT License.
PDF Parser for AI-ready data. Automate PDF accessibility. Open-source.
OpenDataLoader PDF
PDF Parser for AI-ready data. Automate PDF accessibility. Open-source.
![]()


![]()
🔍 PDF parser for AI data extraction — Extract Markdown, JSON (with bounding boxes), and HTML from any PDF. #1 in benchmarks (0.907 overall). Deterministic local mode + AI hybrid mode for complex pages.
- How accurate is it? — #1 in benchmarks: 0.907 overall, 0.928 table accuracy across 200 real-world PDFs including multi-column and scientific papers. Deterministic local mode + AI hybrid mode for complex pages (benchmarks)
- Scanned PDFs and OCR? — Yes. Built-in OCR (80+ languages) in hybrid mode. Works with poor-quality scans at 300 DPI+ (hybrid mode)
- Tables, formulas, images, charts? — Yes. Complex/borderless tables, LaTeX formulas, and AI-generated picture/chart descriptions all via hybrid mode (hybrid mode)
- How do I use this for RAG? —
pip install opendataloader-pdf, convert in 3 lines. Outputs structured Markdown for chunking, JSON with bounding boxes for source citations, and HTML. LangChain integration available. Python, Node.js, Java SDKs (quick start | LangChain)
♿ PDF accessibility automation — The same layout analysis engine also powers auto-tagging. First open-source tool to generate Tagged PDFs end-to-end (coming Q2 2026).
- What's the problem? — Accessibility regulations are now enforced worldwide. Manual PDF remediation costs $50–200 per document and doesn't scale (regulations)
- What's free? — Layout analysis + auto-tagging (Q2 2026, Apache 2.0). Untagged PDF in → Tagged PDF out. No proprietary SDK dependency (auto-tagging preview)
- What about PDF/UA compliance? — Converting Tagged PDF to PDF/UA-1 or PDF/UA-2 is an enterprise add-on. Auto-tagging generates the Tagged PDF; PDF/UA export is the final step (pipeline)
- Why trust this? — Built in collaboration with PDF Association and Dual Lab (veraPDF developers). Auto-tagging follows the Well-Tagged PDF specification, validated with veraPDF (collaboration)
Get Started in 30 Seconds
Requires: Java 11+ and Python 3.10+ (Node.js | Java also available)
Before you start: run
java -version. If not found, install JDK 11+ from Adoptium.
pip install -U opendataloader-pdf
import opendataloader_pdf

# Batch all files in one call — each convert() spawns a JVM process, so repeated calls are slow
opendataloader_pdf.convert(
    input_path=["file1.pdf", "file2.pdf", "folder/"],
    output_dir="output/",
    format="markdown,json"
)
Annotated PDF output — each element (heading, paragraph, table, image) detected with bounding boxes and semantic type.
What Problems Does This Solve?
| Problem | Solution | Status |
|---|---|---|
| PDF structure lost during parsing — wrong reading order, broken tables, no element coordinates | Deterministic local PDF to Markdown/JSON with bounding boxes, XY-Cut++ reading order | Shipped |
| Complex tables, scanned PDFs, formulas, charts need AI-level understanding | Hybrid mode routes complex pages to AI backend (#1 in benchmarks) | Shipped |
| PDF accessibility compliance — EAA, ADA, Section 508 enforced. Manual remediation $50–200/doc | Auto-tagging: layout analysis → Tagged PDF (free, Q2 2026). Built with PDF Association & veraPDF validation. PDF/UA export (enterprise add-on) | Auto-tag: Q2 2026 |
Capability Matrix
| Capability | Supported | Tier |
|---|---|---|
| Data extraction | ||
| Extract text with correct reading order | Yes | Free |
| Bounding boxes for every element | Yes | Free |
| Table extraction (simple borders) | Yes | Free |
| Table extraction (complex/borderless) | Yes | Free (Hybrid) |
| Heading hierarchy detection | Yes | Free |
| List detection (numbered, bulleted, nested) | Yes | Free |
| Image extraction with coordinates | Yes | Free |
| AI chart/image description | Yes | Free (Hybrid) |
| OCR for scanned PDFs | Yes | Free (Hybrid) |
| Formula extraction (LaTeX) | Yes | Free (Hybrid) |
| Tagged PDF structure extraction | Yes | Free |
| AI safety (prompt injection filtering) | Yes | Free |
| Header/footer/watermark filtering | Yes | Free |
| Accessibility | ||
| Auto-tagging → Tagged PDF for untagged PDFs | Coming Q2 2026 | Free (Apache 2.0) |
| PDF/UA-1, PDF/UA-2 export | 💼 Available | Enterprise |
| Accessibility studio (visual editor) | 💼 Available | Enterprise |
| Limitations | ||
| Process Word/Excel/PPT | No | — |
| GPU required | No | — |
Extraction Benchmarks
opendataloader-pdf [hybrid] ranks #1 overall (0.907) across reading order, table, and heading extraction accuracy.
| Engine | Overall | Reading Order | Table | Heading | Speed (s/page) |
|---|---|---|---|---|---|
| opendataloader [hybrid] | 0.907 | 0.934 | 0.928 | 0.821 | 0.463 |
| docling | 0.882 | 0.898 | 0.887 | 0.824 | 0.762 |
| nutrient | 0.880 | 0.924 | 0.662 | 0.811 | 0.230 |
| marker | 0.861 | 0.890 | 0.808 | 0.796 | 53.932 |
| unstructured [hi_res] | 0.841 | 0.904 | 0.588 | 0.749 | 3.008 |
| edgeparse | 0.837 | 0.894 | 0.717 | 0.706 | 0.036 |
| opendataloader | 0.831 | 0.902 | 0.489 | 0.739 | 0.015 |
| mineru | 0.831 | 0.857 | 0.873 | 0.743 | 5.962 |
| pymupdf4llm | 0.732 | 0.885 | 0.401 | 0.412 | 0.091 |
| unstructured | 0.686 | 0.882 | 0.000 | 0.388 | 0.077 |
| markitdown | 0.589 | 0.844 | 0.273 | 0.000 | 0.114 |
| liteparse | 0.576 | 0.866 | 0.000 | 0.000 | 1.061 |
Scores normalized to [0, 1]. Higher is better for accuracy; lower is better for speed. Bold = best. Full benchmark details


Which Mode Should I Use?
| Your Document | Mode | Install | Server Command | Client Command |
|---|---|---|---|---|
| Standard digital PDF | Fast (default) | pip install opendataloader-pdf |
None needed | opendataloader-pdf file1.pdf file2.pdf folder/ |
| Complex or nested tables | Hybrid | pip install "opendataloader-pdf[hybrid]" |
opendataloader-pdf-hybrid --port 5002 |
opendataloader-pdf --hybrid docling-fast file1.pdf file2.pdf folder/ |
| Scanned / image-based PDF | Hybrid + OCR | pip install "opendataloader-pdf[hybrid]" |
opendataloader-pdf-hybrid --port 5002 --force-ocr |
opendataloader-pdf --hybrid docling-fast file1.pdf file2.pdf folder/ |
| Non-English scanned PDF | Hybrid + OCR | pip install "opendataloader-pdf[hybrid]" |
opendataloader-pdf-hybrid --port 5002 --force-ocr --ocr-lang "ko,en" |
opendataloader-pdf --hybrid docling-fast file1.pdf file2.pdf folder/ |
| Mathematical formulas | Hybrid + formula | pip install "opendataloader-pdf[hybrid]" |
opendataloader-pdf-hybrid --enrich-formula |
opendataloader-pdf --hybrid docling-fast --hybrid-mode full file1.pdf file2.pdf folder/ |
| Charts needing description | Hybrid + picture | pip install "opendataloader-pdf[hybrid]" |
opendataloader-pdf-hybrid --enrich-picture-description |
opendataloader-pdf --hybrid docling-fast --hybrid-mode full file1.pdf file2.pdf folder/ |
| Untagged PDFs needing accessibility | Auto-tagging → Tagged PDF | Coming Q2 2026 | — | — |
Quick Start
Python
pip install -U opendataloader-pdf
import opendataloader_pdf

# Batch all files in one call — each convert() spawns a JVM process, so repeated calls are slow
opendataloader_pdf.convert(
    input_path=["file1.pdf", "file2.pdf", "folder/"],
    output_dir="output/",
    format="markdown,json"
)
Node.js
npm install @opendataloader/pdf
import { convert } from '@opendataloader/pdf';

await convert(['file1.pdf', 'file2.pdf', 'folder/'], {
  outputDir: 'output/',
  format: 'markdown,json'
});
Java
<dependency>
  <groupId>org.opendataloader</groupId>
  <artifactId>opendataloader-pdf-core</artifactId>
</dependency>
Python Quick Start | Node.js Quick Start | Java Quick Start
Hybrid Mode: #1 Accuracy for Complex PDFs
Hybrid mode combines fast local Java processing with AI backends. Simple pages stay local (0.02s); complex pages route to AI for +90% table accuracy.
pip install -U "opendataloader-pdf[hybrid]"
Terminal 1 — Start the backend server:
opendataloader-pdf-hybrid --port 5002
Terminal 2 — Process PDFs:
# Batch all files in one call — each invocation spawns a JVM process, so repeated calls are slow
opendataloader-pdf --hybrid docling-fast file1.pdf file2.pdf folder/
Python:
# Batch all files in one call — each convert() spawns a JVM process, so repeated calls are slow
opendataloader_pdf.convert(
    input_path=["file1.pdf", "file2.pdf", "folder/"],
    output_dir="output/",
    hybrid="docling-fast"
)
OCR for Scanned PDFs
Start the backend with --force-ocr for image-based PDFs with no selectable text:
opendataloader-pdf-hybrid --port 5002 --force-ocr
For non-English documents, specify the language:
opendataloader-pdf-hybrid --port 5002 --force-ocr --ocr-lang "ko,en"
Supported languages: en, ko, ja, ch_sim, ch_tra, de, fr, ar, and more.
Formula Extraction (LaTeX)
Extract mathematical formulas as LaTeX from scientific PDFs:
# Server: enable formula enrichment
opendataloader-pdf-hybrid --enrich-formula

# Batch all files in one call — each invocation spawns a JVM process, so repeated calls are slow
opendataloader-pdf --hybrid docling-fast --hybrid-mode full file1.pdf file2.pdf folder/
Output in JSON:
{
  "type": "formula",
  "page number": 1,
  "bounding box": [226.2, 144.7, 377.1, 168.7],
  "content": "\\frac{f(x+h) - f(x)}{h}"
}
Note: Formula and picture description enrichments require
--hybrid-mode fullon the client side.
Chart & Image Description
Generate AI descriptions for charts and images — useful for RAG search and accessibility alt text:
# Server
opendataloader-pdf-hybrid --enrich-picture-description

# Batch all files in one call — each invocation spawns a JVM process, so repeated calls are slow
opendataloader-pdf --hybrid docling-fast --hybrid-mode full file1.pdf file2.pdf folder/
Output in JSON:
{
  "type": "picture",
  "page number": 1,
  "bounding box": [72.0, 400.0, 540.0, 650.0],
  "description": "A bar chart showing waste generation by region from 2016 to 2030..."
}
Uses SmolVLM (256M), a lightweight vision model. Custom prompts supported via
--picture-description-prompt.
Hancom Data Loader Integration — Coming Soon
Enterprise-grade AI document analysis via Hancom Data Loader — customer-customized models trained on your domain-specific documents. 30+ element types (tables, charts, formulas, captions, footnotes, etc.), VLM-based image/chart understanding, complex table extraction (merged cells, nested tables), SLA-backed OCR for scanned documents, and native HWP/HWPX support. Supports PDF, DOCX, XLSX, PPTX, HWP, PNG, JPG. Live demo
Output Formats
| Format | Use Case |
|---|---|
| JSON | Structured data with bounding boxes, semantic types |
| Markdown | Clean text for LLM context, RAG chunks |
| HTML | Web display with styling |
| Annotated PDF | Visual debugging — see detected structures (sample) |
| Text | Plain text extraction |
Combine formats: format="json,markdown"
JSON Output Example
{
  "type": "heading",
  "id": 42,
  "level": "Title",
  "page number": 1,
  "bounding box": [72.0, 700.0, 540.0, 730.0],
  "heading level": 1,
  "font": "Helvetica-Bold",
  "font size": 24.0,
  "text color": "[0.0]",
  "content": "Introduction"
}
| Field | Description |
|---|---|
type |
Element type: heading, paragraph, table, list, image, caption, formula |
id |
Unique identifier for cross-referencing |
page number |
1-indexed page reference |
bounding box |
[left, bottom, right, top] in PDF points (72pt = 1 inch) |
heading level |
Heading depth (1+) |
content |
Extracted text |
Advanced Features
Tagged PDF Support
When a PDF has structure tags, OpenDataLoader extracts the exact layout the author intended — no guessing, no heuristics. Headings, lists, tables, and reading order are preserved from the source.
# Batch all files in one call — each convert() spawns a JVM process, so repeated calls are slow
opendataloader_pdf.convert(
    input_path=["file1.pdf", "file2.pdf", "folder/"],
    output_dir="output/",
    use_struct_tree=True           # Use native PDF structure tags
)
Most PDF parsers ignore structure tags entirely. Learn more
AI Safety: Prompt Injection Protection
PDFs can contain hidden prompt injection attacks. OpenDataLoader automatically filters:
- Hidden text (transparent, zero-size fonts)
- Off-page content
- Suspicious invisible layers
To sanitize sensitive data (emails, URLs, phone numbers → placeholders), enable it explicitly:
# Batch all files in one call — each invocation spawns a JVM process, so repeated calls are slow
opendataloader-pdf file1.pdf file2.pdf folder/ --sanitize
LangChain Integration
pip install -U langchain-opendataloader-pdf
from langchain_opendataloader_pdf import OpenDataLoaderPDFLoader

loader = OpenDataLoaderPDFLoader(
    file_path=["file1.pdf", "file2.pdf", "folder/"],
    format="text"
)
documents = loader.load()
LangChain Docs | GitHub | PyPI
Advanced Options
# Batch all files in one call — each convert() spawns a JVM process, so repeated calls are slow
opendataloader_pdf.convert(
    input_path=["file1.pdf", "file2.pdf", "folder/"],
    output_dir="output/",
    format="json,markdown,pdf",
    image_output="embedded",        # "off", "embedded" (Base64), or "external" (default)
    image_format="jpeg",            # "png" or "jpeg"
    use_struct_tree=True,           # Use native PDF structure
)
PDF Accessibility & PDF/UA Conversion
Problem: Millions of existing PDFs lack structure tags, failing accessibility regulations (EAA, ADA/Section 508, Korea Digital Inclusion Act). Manual remediation costs $50–200 per document and doesn't scale.
OpenDataLoader's approach: Built in collaboration with PDF Association and Dual Lab (developers of veraPDF, the industry-reference open-source PDF/A and PDF/UA validator). Auto-tagging follows the Well-Tagged PDF specification and is validated programmatically using veraPDF — automated conformance checks against PDF accessibility standards, not manual review. No existing open-source tool generates Tagged PDFs end-to-end — most rely on proprietary SDKs for the tag-writing step. OpenDataLoader does it all under Apache 2.0. (collaboration details)
| Regulation | Deadline | Requirement |
|---|---|---|
| European Accessibility Act (EAA) | June 28, 2025 | Accessible digital products across the EU |
| ADA & Section 508 | In effect | U.S. federal agencies and public accommodations |
| Digital Inclusion Act | In effect | South Korea digital service accessibility |
Standards & Validation
| Aspect | Detail |
|---|---|
| Specification | Well-Tagged PDF by PDF Association |
| Validation | veraPDF — industry-reference open-source PDF/A & PDF/UA validator |
| Collaboration | PDF Association + Dual Lab (veraPDF developers) co-develop tagging and validation |
| License | Auto-tagging → Tagged PDF: Apache 2.0 (free). PDF/UA export: Enterprise |
Accessibility Pipeline
| Step | Feature | Status | Tier |
|---|---|---|---|
| 1. Audit | Read existing PDF tags, detect untagged PDFs | Shipped | Free |
| 2. Auto-tag → Tagged PDF | Generate structure tags for untagged PDFs | Coming Q2 2026 | Free (Apache 2.0) |
| 3. Export PDF/UA | Convert to PDF/UA-1 or PDF/UA-2 compliant files | 💼 Available | Enterprise |
| 4. Visual editing | Accessibility studio — review and fix tags | 💼 Available | Enterprise |
💼 Enterprise features are available on request. Contact us to get started.
Auto-Tagging Preview (Coming Q2 2026)
# API shape preview — available Q2 2026
opendataloader_pdf.convert(
    input_path=["file1.pdf", "file2.pdf", "folder/"],
    output_dir="output/",
    auto_tag=True                   # Generate structure tags for untagged PDFs
)
End-to-End Compliance Workflow
Existing PDFs (untagged)
    │
    ▼
┌─────────────────┐    ┌─────────────────┐    ┌─────────────────┐    ┌─────────────────┐
│  1. Audit       │───>│  2. Auto-Tag    │───>│  3. Export       │───>│  4. Studio       │
│  (check tags)   │    │  (→ Tagged PDF) │    │  (PDF/UA)        │    │  (visual editor) │
└─────────────────┘    └─────────────────┘    └─────────────────┘    └─────────────────┘
        │                      │                      │                      │
        ▼                      ▼                      ▼                      ▼
  use_struct_tree         auto_tag              PDF/UA export       Accessibility Studio
  (Available now)    (Q2 2026, Apache 2.0)    (Enterprise)          (Enterprise)
Roadmap
| Feature | Timeline | Tier |
|---|---|---|
| Auto-tagging → Tagged PDF — Generate Tagged PDFs from untagged PDFs | Q2 2026 | Free |
| Hancom Data Loader — Enterprise AI document analysis, customer-customized models, VLM-based chart/image understanding, production-grade OCR | Q2-Q3 2026 | Planned |
| Structure validation — Verify PDF tag trees | Q2 2026 | Planned |
Frequently Asked Questions
What is the best PDF parser for RAG?
For RAG pipelines, you need a parser that preserves document structure, maintains correct reading order, and provides element coordinates for citations. OpenDataLoader is designed specifically for this — it outputs structured JSON with bounding boxes, handles multi-column layouts with XY-Cut++, and runs locally without GPU. In hybrid mode, it ranks #1 overall (0.907) in benchmarks.
What is the best open-source PDF parser?
OpenDataLoader PDF is the only open-source parser that combines: rule-based deterministic extraction (no GPU), bounding boxes for every element, XY-Cut++ reading order, built-in AI safety filters, native Tagged PDF support, and hybrid AI mode for complex documents. It ranks #1 in overall accuracy (0.907) while running locally on CPU.
How do I extract tables from PDF for LLM?
OpenDataLoader detects tables using border analysis and text clustering, preserving row/column structure. For complex tables, enable hybrid mode for +90% accuracy improvement (0.489 to 0.928 TEDS score):
# Batch all files in one call — each convert() spawns a JVM process, so repeated calls are slow
opendataloader_pdf.convert(
    input_path=["file1.pdf", "file2.pdf", "folder/"],
    output_dir="output/",
    format="json",
    hybrid="docling-fast"           # For complex tables
)
How does it compare to docling, marker, or pymupdf4llm?
OpenDataLoader [hybrid] ranks #1 overall (0.907) across reading order, table, and heading accuracy. Key differences: docling (0.882) is strong but lacks bounding boxes and AI safety filters. marker (0.861) requires GPU and is 1000x slower (53.932s/page). pymupdf4llm (0.732) is fast but has poor table (0.401) and heading (0.412) accuracy. OpenDataLoader is the only parser that combines deterministic local extraction, bounding boxes for every element, and built-in prompt injection protection. See full benchmark.
Can I use this without sending data to the cloud?
Yes. OpenDataLoader runs 100% locally. No API calls, no data transmission — your documents never leave your environment. The hybrid mode backend also runs locally on your machine. Ideal for legal, healthcare, and financial documents.
Does it support OCR for scanned PDFs?
Yes, via hybrid mode. Install with pip install "opendataloader-pdf[hybrid]", start the backend with --force-ocr, then process as usual. Supports multiple languages including Korean, Japanese, Chinese, Arabic, and more via --ocr-lang.
Does it work with Korean, Japanese, or Chinese documents?
Yes. For digital PDFs, text extraction works out of the box. For scanned PDFs, use hybrid mode with --force-ocr --ocr-lang "ko,en" (or ja, ch_sim, ch_tra). Coming soon: Hancom Data Loader integration — enterprise-grade AI document analysis with built-in production-grade OCR and customer-customized models optimized for your specific document types and workflows.
How fast is it?
Local mode processes 60+ pages per second on CPU (0.02s/page). Hybrid mode processes 2+ pages per second (0.46s/page) with significantly higher accuracy for complex documents. No GPU required. Benchmarked on Apple M4. Full benchmark details. With multi-process batch processing, throughput exceeds 100 pages per second on 8+ core machines.
Does it handle multi-column layouts?
Yes. OpenDataLoader uses XY-Cut++ reading order analysis to correctly sequence text across multi-column pages, sidebars, and mixed layouts. This works in both local and hybrid modes without any configuration.
What is hybrid mode?
Hybrid mode combines fast local Java processing with an AI backend. Simple pages are processed locally (0.02s/page); complex pages (tables, scanned content, formulas, charts) are automatically routed to the AI backend for higher accuracy. The backend runs locally on your machine — no cloud required. See Which Mode Should I Use? and Hybrid Mode Guide.
Does it work with LangChain?
Yes. Install langchain-opendataloader-pdf for an official LangChain document loader integration. See LangChain docs.
How do I chunk PDFs for RAG?
OpenDataLoader outputs structured Markdown with headings, tables, and lists preserved — ideal input for semantic chunking. Each element in JSON output includes type, heading level, and page number, so you can split by section or page boundary. For most RAG pipelines: parse with format="markdown" for text chunks, or format="json" when you need element-level control. Pair with LangChain's RecursiveCharacterTextSplitter or your own heading-based splitter for best results.
How do I cite PDF sources in RAG answers?
Every element in JSON output includes a bounding box ([left, bottom, right, top] in PDF points) and page number. When your RAG pipeline returns an answer, map the source chunk back to its bounding box to highlight the exact location in the original PDF. This enables "click to source" UX — users see which paragraph, table, or figure the answer came from. No other open-source parser provides bounding boxes for every element by default.
How do I convert PDF to Markdown for LLM?
import opendataloader_pdf

# Batch all files in one call — each convert() spawns a JVM process, so repeated calls are slow
opendataloader_pdf.convert(
    input_path=["file1.pdf", "file2.pdf", "folder/"],
    output_dir="output/",
    format="markdown"
)
OpenDataLoader preserves heading hierarchy, table structure, and reading order in the Markdown output. For complex documents with borderless tables or scanned pages, use hybrid mode (hybrid="docling-fast") for higher accuracy. The output is clean enough to feed directly into LLM context windows or RAG chunking pipelines.
Is there an automated PDF accessibility remediation tool?
Yes. OpenDataLoader is the first open-source tool that automates PDF accessibility end-to-end. Built in collaboration with PDF Association and Dual Lab (veraPDF developers), auto-tagging follows the Well-Tagged PDF specification and is validated programmatically using veraPDF. The layout analysis engine detects document structure (headings, tables, lists, reading order) and generates accessibility tags automatically. Auto-tagging (Q2 2026) converts untagged PDFs into Tagged PDFs under Apache 2.0 — no proprietary SDK dependency. For organizations needing full PDF/UA compliance, enterprise add-ons provide PDF/UA export and a visual tag editor. This replaces manual remediation workflows that typically cost $50–200+ per document.
Is this really the first open-source PDF auto-tagging tool?
Yes. Existing tools either depend on proprietary SDKs for writing structure tags, only output non-PDF formats (e.g., Docling outputs Markdown/JSON but cannot produce Tagged PDFs), or require manual intervention. OpenDataLoader is the first to do layout analysis → tag generation → Tagged PDF output entirely under an open-source license (Apache 2.0), with no proprietary dependency. Auto-tagging follows the PDF Association's Well-Tagged PDF specification and is validated using veraPDF, the industry-reference open-source PDF/A and PDF/UA validator.
How do I convert existing PDFs to PDF/UA?
OpenDataLoader provides an end-to-end pipeline: audit existing PDFs for tags (use_struct_tree=True), auto-tag untagged PDFs into Tagged PDFs (Q2 2026, free under Apache 2.0), and export as PDF/UA-1 or PDF/UA-2 (enterprise add-on). Auto-tagging follows the PDF Association's Well-Tagged PDF specification and is validated using veraPDF. Auto-tagging generates the Tagged PDF; PDF/UA export is the final step. Contact us for enterprise integration.
How do I make my PDFs accessible for EAA compliance?
The European Accessibility Act requires accessible digital products by June 28, 2025. OpenDataLoader supports the full remediation workflow: audit → auto-tag → Tagged PDF → PDF/UA export. Auto-tagging follows the PDF Association's Well-Tagged PDF specification and is validated using veraPDF, ensuring standards-compliant output. Auto-tagging to Tagged PDF will be open-sourced under Apache 2.0 (Q2 2026). PDF/UA export and accessibility studio are enterprise add-ons. See our Accessibility Guide.
Is OpenDataLoader PDF free?
The core library is open-source under Apache 2.0 — free for commercial use. This includes all extraction features (text, tables, images, OCR, formulas, charts via hybrid mode), AI safety filters, Tagged PDF support, and auto-tagging to Tagged PDF (Q2 2026). We are committed to keeping the core accessibility pipeline (layout analysis → auto-tagging → Tagged PDF) free and open-source. Enterprise add-ons (PDF/UA export, accessibility studio) are available for organizations needing end-to-end regulatory compliance.
Why did the license change from MPL 2.0 to Apache 2.0?
MPL 2.0 requires file-level copyleft, which often triggers legal review before enterprise adoption. Apache 2.0 is fully permissive — no copyleft obligations, easier to integrate into commercial projects. If you are using a pre-2.0 version, it remains under MPL 2.0 and you can continue using it. Upgrading to 2.0+ means your project follows Apache 2.0 terms, which are strictly more permissive — no additional obligations, no action needed on your side.
Documentation
- Quick Start (Python)
- Quick Start (Node.js)
- Quick Start (Java)
- JSON Schema Reference
- CLI Options
- Hybrid Mode Guide
- Tagged PDF Support
- AI Safety Features
- PDF Accessibility
Contributing
We welcome contributions! See CONTRIBUTING.md for guidelines.
License
Note: Versions prior to 2.0 are licensed under the Mozilla Public License 2.0.
Found this useful? Give us a star to help others discover OpenDataLoader.