real time face swap and one-click video deepfake with only a single image
Deep-Live-Cam 2.1
Real-time face swap and video deepfake with a single click and only a single image.
Disclaimer
This deepfake software is designed to be a productive tool for the AI-generated media industry. It can assist artists in animating custom characters, creating engaging content, and even using models for clothing design.
We are aware of the potential for unethical applications and are committed to preventative measures. A built-in check prevents the program from processing inappropriate media (nudity, graphic content, sensitive material like war footage, etc.). We will continue to develop this project responsibly, adhering to the law and ethics. We may shut down the project or add watermarks if legally required.
-
Ethical Use: Users are expected to use this software responsibly and legally. If using a real person's face, obtain their consent and clearly label any output as a deepfake when sharing online.
-
Content Restrictions: The software includes built-in checks to prevent processing inappropriate media, such as nudity, graphic content, or sensitive material.
-
Legal Compliance: We adhere to all relevant laws and ethical guidelines. If legally required, we may shut down the project or add watermarks to the output.
-
User Responsibility: We are not responsible for end-user actions. Users must ensure their use of the software aligns with ethical standards and legal requirements.
By using this software, you agree to these terms and commit to using it in a manner that respects the rights and dignity of others.
Users are expected to use this software responsibly and legally. If using a real person's face, obtain their consent and clearly label any output as a deepfake when sharing online. We are not responsible for end-user actions.
Exclusive v2.7 beta Quick Start - Pre-built (Windows/Mac Silicon/CPU)

This is the fastest build you can get if you have a discrete NVIDIA or AMD GPU, CPU or Mac Silicon, And you'll receive special priority support. 2.7 beta is the best you can have with 30+ extra features than the open source version.
These Pre-builts are perfect for non-technical users or those who don't have time to, or can't manually install all the requirements. Just a heads-up: this is an open-source project, so you can also install it manually.
TLDR; Live Deepfake in just 3 Clicks
- Select a face
- Select which camera to use
- Press live!
Features & Uses - Everything is in real-time
Mouth Mask
Retain your original mouth for accurate movement using Mouth Mask

Face Mapping
Use different faces on multiple subjects simultaneously

Your Movie, Your Face
Watch movies with any face in real-time

Live Show
Run Live shows and performances

Memes
Create Your Most Viral Meme Yet

Created using Many Faces feature in Deep-Live-Cam
Omegle
Surprise people on Omegle
Installation (Manual)
Please be aware that the installation requires technical skills and is not for beginners. Consider downloading the quickstart version.
Click to see the process
Installation
This is more likely to work on your computer but will be slower as it utilizes the CPU.
1. Set up Your Platform
- Python (3.11 recommended)
- pip
- git
- ffmpeg -
iex (irm ffmpeg.tc.ht) - Visual Studio 2022 Runtimes (Windows)
2. Clone the Repository
git clone https://github.com/hacksider/Deep-Live-Cam.git
cd Deep-Live-Cam
3. Download the Models
Place these files in the "models" folder.
4. Install Dependencies
We highly recommend using a venv to avoid issues.
For Windows:
python -m venv venv
venv\Scripts\activate
pip install -r requirements.txt
For Linux:
# Ensure you use the installed Python 3.10
python3 -m venv venv
source venv/bin/activate
pip install -r requirements.txt
For macOS:
Apple Silicon (M1/M2/M3) requires specific setup:
# Install Python 3.11 (specific version is important)
brew install python@3.11

# Install tkinter package (required for the GUI)
brew install python-tk@3.10

# Create and activate virtual environment with Python 3.11
python3.11 -m venv venv
source venv/bin/activate

# Install dependencies
pip install -r requirements.txt
** In case something goes wrong and you need to reinstall the virtual environment **
# Deactivate the virtual environment
rm -rf venv

# Reinstall the virtual environment
python -m venv venv
source venv/bin/activate

# install the dependencies again
pip install -r requirements.txt

# gfpgan and basicsrs issue fix
pip install git+https://github.com/xinntao/BasicSR.git@master
pip uninstall gfpgan -y
pip install git+https://github.com/TencentARC/GFPGAN.git@master
Run: If you don't have a GPU, you can run Deep-Live-Cam using python run.py. Note that initial execution will download models (~300MB).
GPU Acceleration
CUDA Execution Provider (Nvidia)
- Install CUDA Toolkit 12.8.0
- Install cuDNN v8.9.7 for CUDA 12.x (required for onnxruntime-gpu):
- Download cuDNN v8.9.7 for CUDA 12.x
- Make sure the cuDNN bin directory is in your system PATH
- Install dependencies:
pip install -U torch torchvision torchaudio --index-url https://download.pytorch.org/whl/cu128
pip uninstall onnxruntime onnxruntime-gpu
pip install onnxruntime-gpu==1.21.0
- Usage:
python run.py --execution-provider cuda
CoreML Execution Provider (Apple Silicon)
Apple Silicon (M1/M2/M3) specific installation:
- Make sure you've completed the macOS setup above using Python 3.10.
- Install dependencies:
pip uninstall onnxruntime onnxruntime-silicon
pip install onnxruntime-silicon==1.13.1
- Usage (important: specify Python 3.10):
python3.10 run.py --execution-provider coreml
Important Notes for macOS:
- You must use Python 3.10, not newer versions like 3.11 or 3.13
- Always run with
python3.10command not justpythonif you have multiple Python versions installed - If you get error about
_tkintermissing, reinstall the tkinter package:brew reinstall python-tk@3.10 - If you get model loading errors, check that your models are in the correct folder
- If you encounter conflicts with other Python versions, consider uninstalling them:
# List all installed Python versions
brew list | grep python

# Uninstall conflicting versions if needed
brew uninstall --ignore-dependencies python@3.11 python@3.13

# Keep only Python 3.11
brew cleanup
CoreML Execution Provider (Apple Legacy)
- Install dependencies:
pip uninstall onnxruntime onnxruntime-coreml
pip install onnxruntime-coreml==1.21.0
- Usage:
python run.py --execution-provider coreml
DirectML Execution Provider (Windows)
- Install dependencies:
pip uninstall onnxruntime onnxruntime-directml
pip install onnxruntime-directml==1.21.0
- Usage:
python run.py --execution-provider directml
OpenVINO™ Execution Provider (Intel)
- Install dependencies:
pip uninstall onnxruntime onnxruntime-openvino
pip install onnxruntime-openvino==1.21.0
- Usage:
python run.py --execution-provider openvino
Usage
1. Image/Video Mode
- Execute
python run.py. - Choose a source face image and a target image/video.
- Click "Start".
- The output will be saved in a directory named after the target video.
2. Webcam Mode
- Execute
python run.py. - Select a source face image.
- Click "Live".
- Wait for the preview to appear (10-30 seconds).
- Use a screen capture tool like OBS to stream.
- To change the face, select a new source image.
Download all models in this huggingface link
Command Line Arguments (Unmaintained)
options:
  -h, --help                                               show this help message and exit
  -s SOURCE_PATH, --source SOURCE_PATH                     select a source image
  -t TARGET_PATH, --target TARGET_PATH                     select a target image or video
  -o OUTPUT_PATH, --output OUTPUT_PATH                     select output file or directory
  --frame-processor FRAME_PROCESSOR [FRAME_PROCESSOR ...]  frame processors (choices: face_swapper, face_enhancer, ...)
  --keep-fps                                               keep original fps
  --keep-audio                                             keep original audio
  --keep-frames                                            keep temporary frames
  --many-faces                                             process every face
  --map-faces                                              map source target faces
  --mouth-mask                                             mask the mouth region
  --video-encoder {libx264,libx265,libvpx-vp9}             adjust output video encoder
  --video-quality [0-51]                                   adjust output video quality
  --live-mirror                                            the live camera display as you see it in the front-facing camera frame
  --live-resizable                                         the live camera frame is resizable
  --max-memory MAX_MEMORY                                  maximum amount of RAM in GB
  --execution-provider {cpu} [{cpu} ...]                   available execution provider (choices: cpu, ...)
  --execution-threads EXECUTION_THREADS                    number of execution threads
  -v, --version                                            show program's version number and exit
Looking for a CLI mode? Using the -s/--source argument will make the run program in cli mode.
Press
- Ars Technica - "Deep-Live-Cam goes viral, allowing anyone to become a digital doppelganger"
- Yahoo! - "OK, this viral AI live stream software is truly terrifying"
- CNN Brasil - "AI can clone faces on webcam; understand how it works"
- Bloomberg Technoz - "Get to know Deep Live Cam technology, it can be used as a tool for deception."
- TrendMicro - "AI vs AI: DeepFakes and eKYC"
- PetaPixel - "Deepfake AI Tool Lets You Become Anyone in a Video Call With Single Photo"
- SomeOrdinaryGamers - "That's Crazy, Oh God. That's Fucking Freaky Dude... That's So Wild Dude"
- IShowSpeed - "Alright look look look, now look chat, we can do any face we want to look like chat"
- TechLinked (Linus Tech Tips) - "They do a pretty good job matching poses, expression and even the lighting"
- IShowSpeed - "What the F**! Why do I look like Vinny Jr? I look exactly like Vinny Jr!? No, this shit is crazy! Bro This is F*** Crazy!"*
Credits
- ffmpeg: for making video-related operations easy
- Henry: One of the major contributor in this repo
- deepinsight: for their insightface project which provided a well-made library and models. Please be reminded that the use of the model is for non-commercial research purposes only.
- havok2-htwo: for sharing the code for webcam
- GosuDRM: for the open version of roop
- pereiraroland26: Multiple faces support
- vic4key: For supporting/contributing to this project
- kier007: for improving the user experience
- qitianai: for multi-lingual support
- laurigates: Decoupling stuffs to make everything faster!
- and all developers behind libraries used in this project.
- Footnote: Please be informed that the base author of the code is s0md3v
- All the wonderful users who helped make this project go viral by starring the repo ❤️
Contributions

Stars to the Moon 🚀
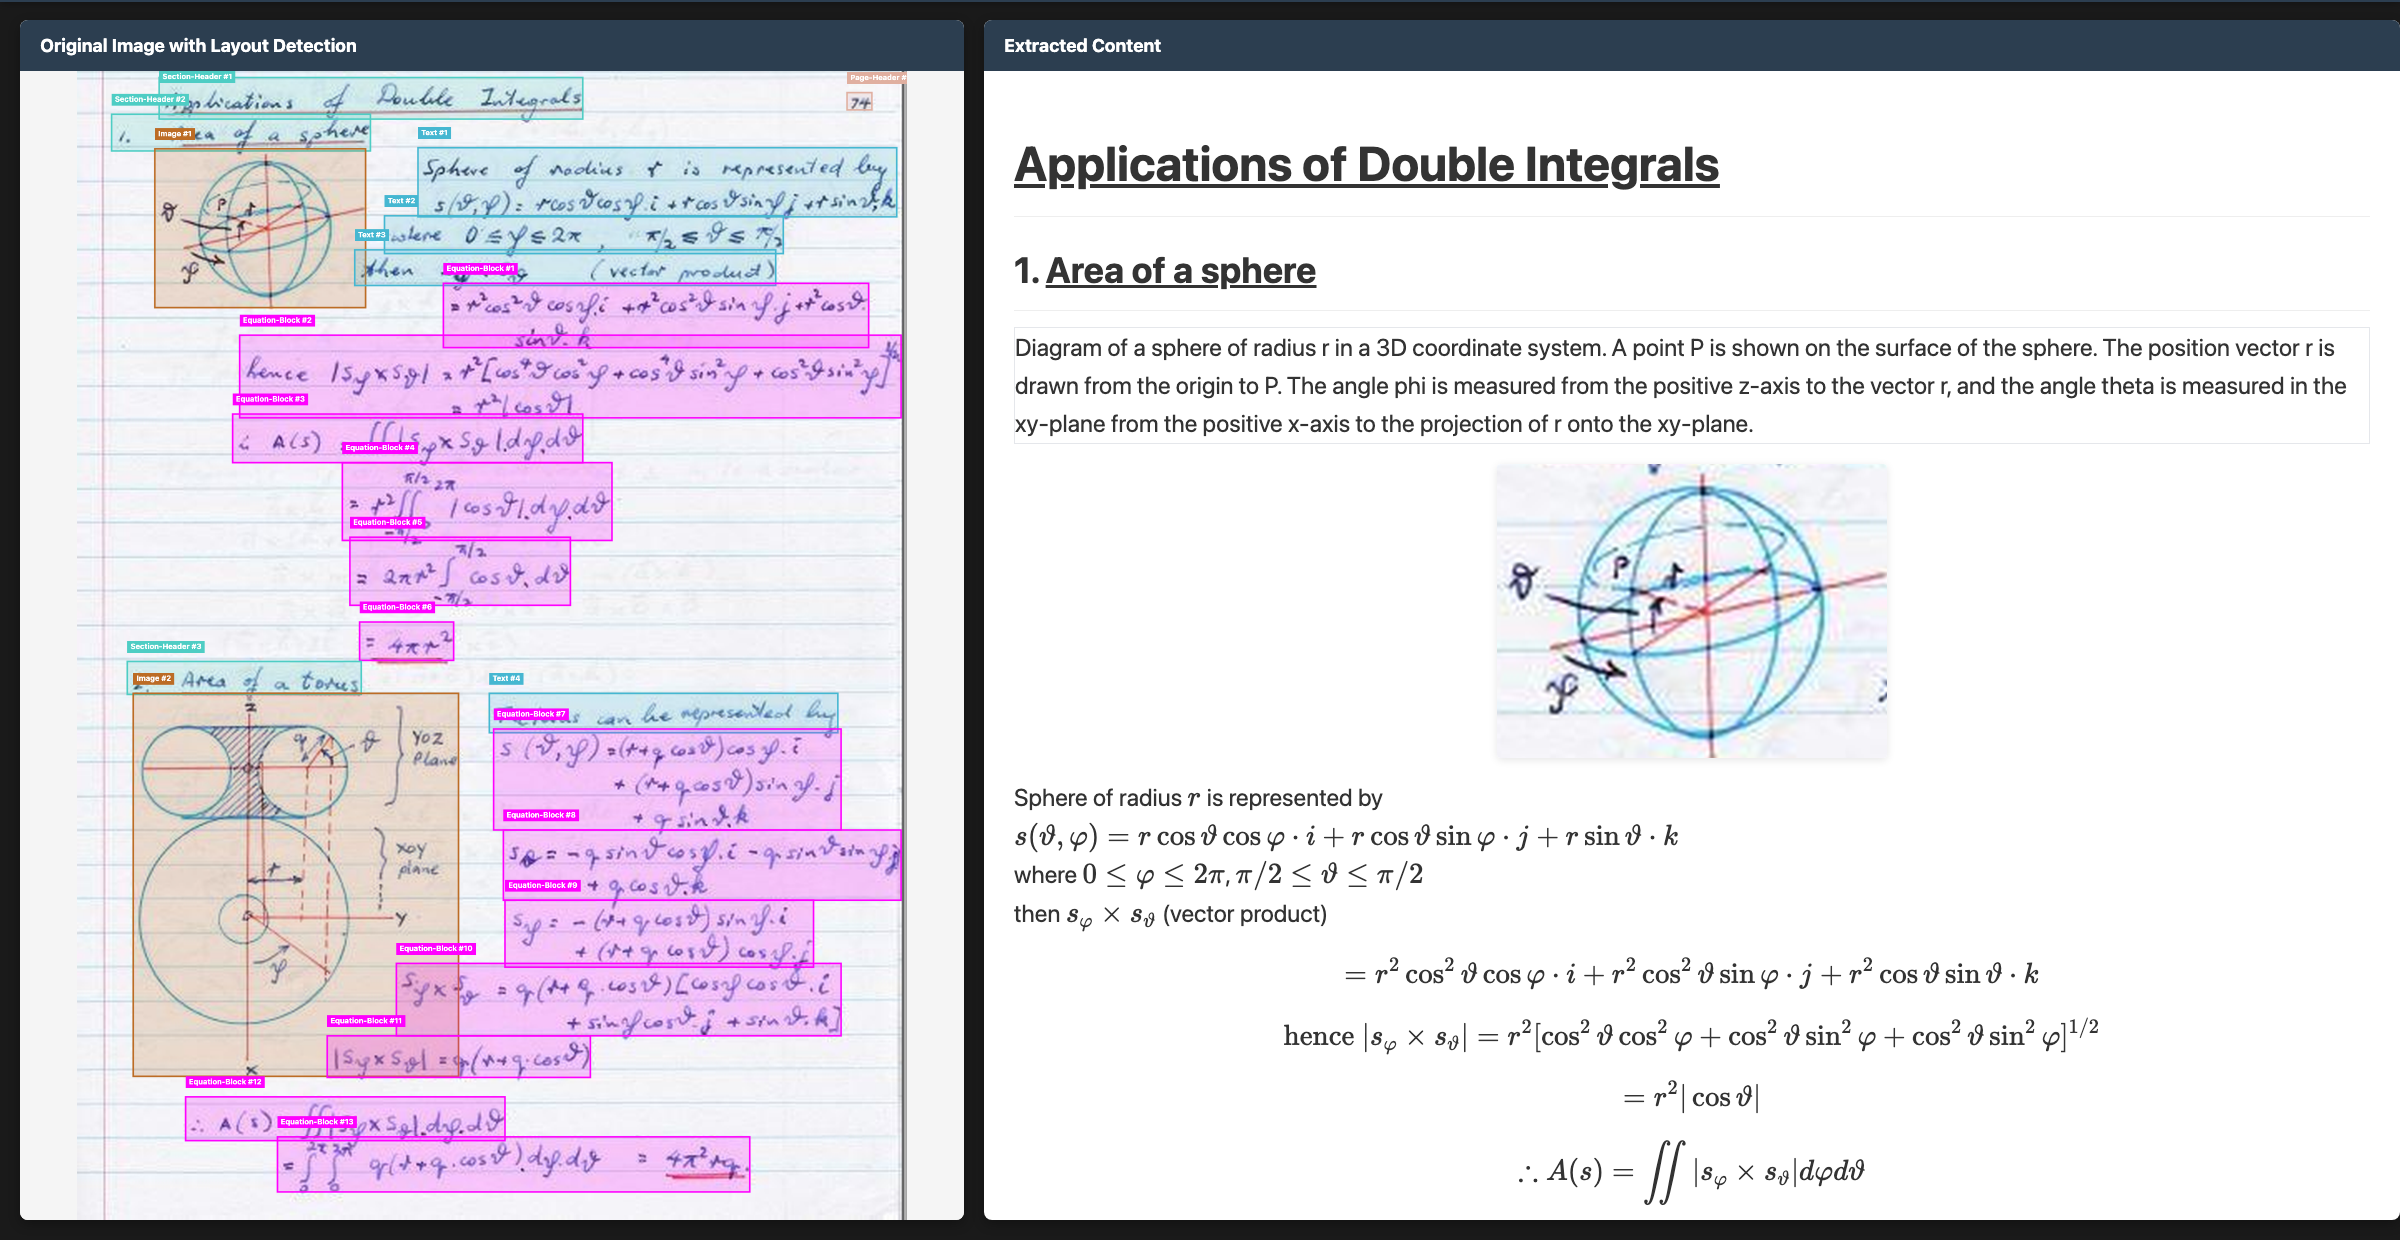
OCR model that handles complex tables, forms, handwriting with full layout.
![]()
Datalab
State of the Art models for Document Intelligence
![]()
![]()
Chandra OCR 2
Chandra OCR 2 is a state of the art OCR model that converts images and PDFs into structured HTML/Markdown/JSON while preserving layout information.
News
- 3/2026 - Chandra 2 is here with significant improvements to math, tables, layout, and multilingual OCR
- 10/2025 - Chandra 1 launched
Features
- Tops external olmocr benchmark and significant improvement in internal multilingual benchmarks
- Convert documents to markdown, html, or json with detailed layout information
- Support for 90+ languages (benchmark below)
- Excellent handwriting support
- Reconstructs forms accurately, including checkboxes
- Strong performance with tables, math, and complex layouts
- Extracts images and diagrams, and adds captions and structured data
- Two inference modes: local (HuggingFace) and remote (vLLM server)
Hosted API
- We have a hosted API for Chandra here, which is more accurate and faster.
- There is a free playground here if you want to try Chandra without installing.
Quickstart
The easiest way to start is with the CLI tools:
pip install chandra-ocr

# With vLLM (recommended, lightweight install)
chandra_vllm
chandra input.pdf ./output

# With HuggingFace (requires torch)
pip install chandra-ocr[hf]
chandra input.pdf ./output --method hf

# Interactive streamlit app
pip install chandra-ocr[app]
chandra_app
Benchmarks
Multilingual performance was a focus for us with Chandra 2. There isn't a good public multilingual OCR benchmark, so we made our own. This tests tables, math, ordering, layout, and text accuracy.

See full scores below. We also have a full 90-language benchmark.
We also benchmarked Chandra 2 with the widely accepted olmocr benchmark:
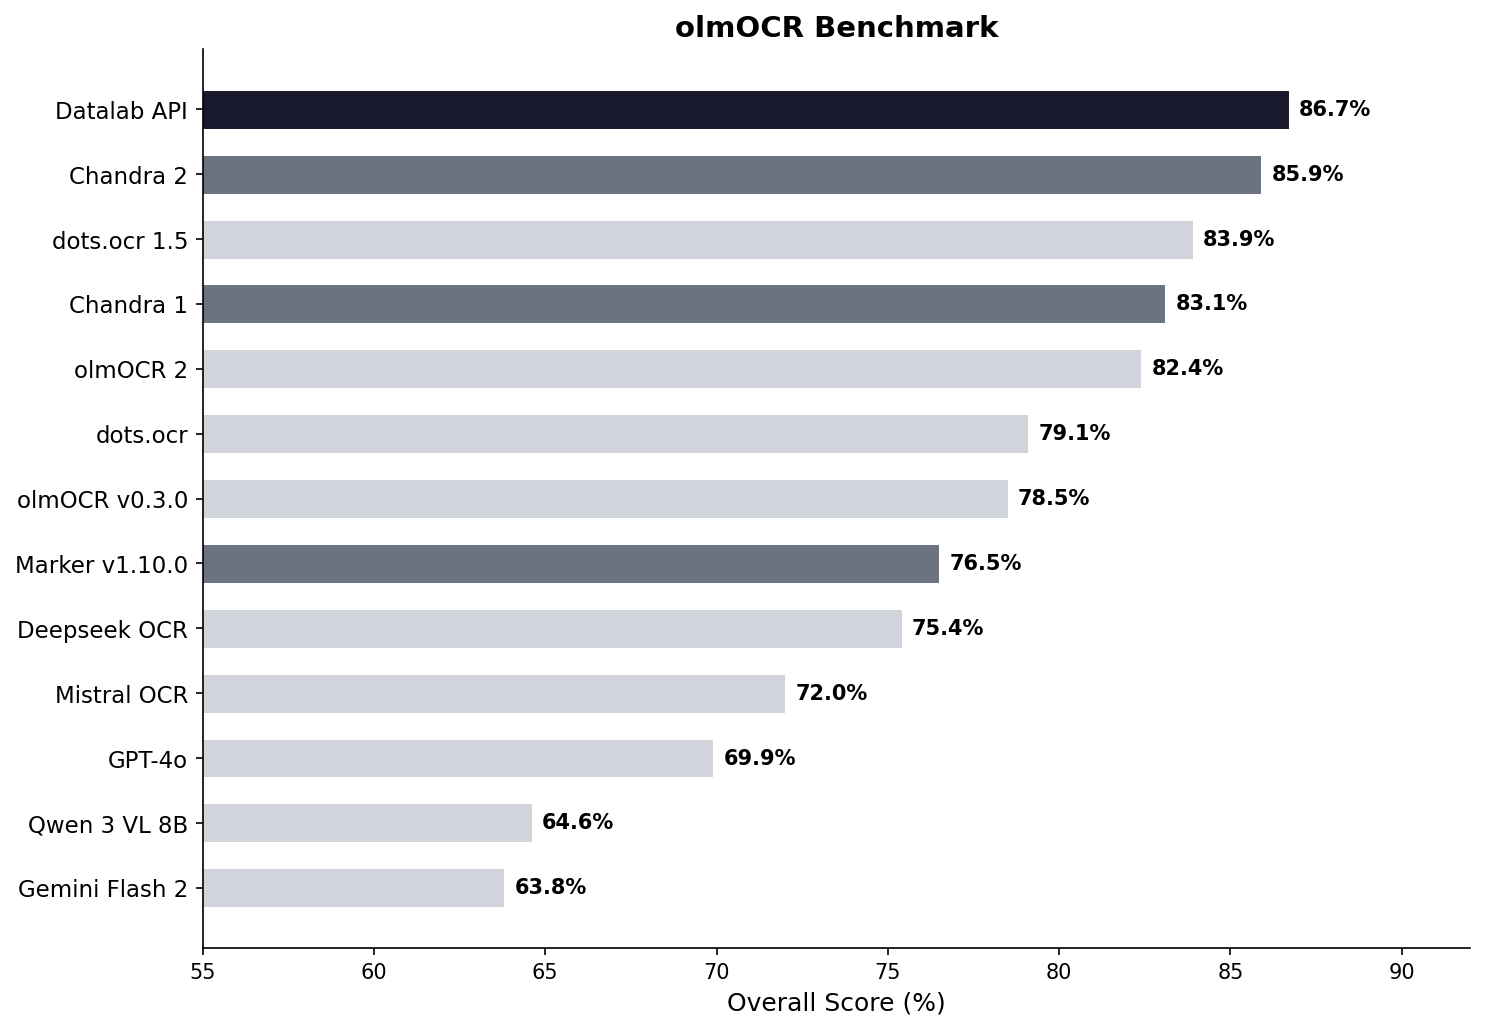
See full scores below.
Examples
| Type | Name | Link |
|---|---|---|
| Math | CS229 Textbook | View |
| Math | Handwritten Math | View |
| Math | Chinese Math | View |
| Tables | Statistical Distribution | View |
| Tables | Financial Table | View |
| Forms | Registration Form | View |
| Forms | Lease Form | View |
| Handwriting | Cursive Writing | View |
| Handwriting | Handwritten Notes | View |
| Languages | Arabic | View |
| Languages | Japanese | View |
| Languages | Hindi | View |
| Languages | Russian | View |
| Other | Charts | View |
| Other | Chemistry | View |
Installation
Package
# Base install (for vLLM backend)
pip install chandra-ocr

# With HuggingFace backend (includes torch, transformers)
pip install chandra-ocr[hf]

# With all extras
pip install chandra-ocr[all]
If you're using the HuggingFace method, we also recommend installing flash attention for better performance.
From Source
git clone https://github.com/datalab-to/chandra.git
cd chandra
uv sync
source .venv/bin/activate
Usage
CLI
Process single files or entire directories:
# Single file, with vllm server (see below for how to launch vllm)
chandra input.pdf ./output --method vllm

# Process all files in a directory with local model
chandra ./documents ./output --method hf
CLI Options:
--method [hf|vllm]: Inference method (default: vllm)--page-range TEXT: Page range for PDFs (e.g., "1-5,7,9-12")--max-output-tokens INTEGER: Max tokens per page--max-workers INTEGER: Parallel workers for vLLM--include-images/--no-images: Extract and save images (default: include)--include-headers-footers/--no-headers-footers: Include page headers/footers (default: exclude)--batch-size INTEGER: Pages per batch (default: 28 for vllm, 1 for hf)
Output Structure:
Each processed file creates a subdirectory with:
<filename>.md- Markdown output<filename>.html- HTML output<filename>_metadata.json- Metadata (page info, token count, etc.)- Extracted images are saved directly in the output directory
Streamlit Web App
Launch the interactive demo for single-page processing:
chandra_app
vLLM Server (Optional)
For production deployments or batch processing, use the vLLM server:
chandra_vllm
This launches a Docker container with optimized inference settings. Configure via environment variables:
VLLM_API_BASE: Server URL (default:http://localhost:8000/v1)VLLM_MODEL_NAME: Model name for the server (default:chandra)VLLM_GPUS: GPU device IDs (default:0)
You can also start your own vllm server with the datalab-to/chandra-ocr-2 model.
Configuration
Settings can be configured via environment variables or a local.env file:
# Model settings
MODEL_CHECKPOINT=datalab-to/chandra-ocr-2
MAX_OUTPUT_TOKENS=12384

# vLLM settings
VLLM_API_BASE=http://localhost:8000/v1
VLLM_MODEL_NAME=chandra
VLLM_GPUS=0
Commercial usage
This code is Apache 2.0, and our model weights use a modified OpenRAIL-M license (free for research, personal use, and startups under $2M funding/revenue, cannot be used competitively with our API). To remove the OpenRAIL license requirements, or for broader commercial licensing, visit our pricing page here.
Benchmark table
| Model | ArXiv | Old Scans Math | Tables | Old Scans | Headers and Footers | Multi column | Long tiny text | Base | Overall | Source |
|---|---|---|---|---|---|---|---|---|---|---|
| Datalab API | 90.4 | 90.2 | 90.7 | 54.6 | 91.6 | 83.7 | 92.3 | 99.9 | 86.7 ± 0.8 | Own benchmarks |
| Chandra 2 | 90.2 | 89.3 | 89.9 | 49.8 | 92.5 | 83.5 | 92.1 | 99.6 | 85.9 ± 0.8 | Own benchmarks |
| dots.ocr 1.5 | 85.9 | 85.5 | 90.7 | 48.2 | 94.0 | 85.3 | 81.6 | 99.7 | 83.9 | dots.ocr repo |
| Chandra 1 | 82.2 | 80.3 | 88.0 | 50.4 | 90.8 | 81.2 | 92.3 | 99.9 | 83.1 ± 0.9 | Own benchmarks |
| olmOCR 2 | 83.0 | 82.3 | 84.9 | 47.7 | 96.1 | 83.7 | 81.9 | 99.6 | 82.4 | olmocr repo |
| dots.ocr | 82.1 | 64.2 | 88.3 | 40.9 | 94.1 | 82.4 | 81.2 | 99.5 | 79.1 ± 1.0 | dots.ocr repo |
| olmOCR v0.3.0 | 78.6 | 79.9 | 72.9 | 43.9 | 95.1 | 77.3 | 81.2 | 98.9 | 78.5 ± 1.1 | olmocr repo |
| Datalab Marker v1.10.0 | 83.8 | 69.7 | 74.8 | 32.3 | 86.6 | 79.4 | 85.7 | 99.6 | 76.5 ± 1.0 | Own benchmarks |
| Deepseek OCR | 75.2 | 72.3 | 79.7 | 33.3 | 96.1 | 66.7 | 80.1 | 99.7 | 75.4 ± 1.0 | Own benchmarks |
| Mistral OCR API | 77.2 | 67.5 | 60.6 | 29.3 | 93.6 | 71.3 | 77.1 | 99.4 | 72.0 ± 1.1 | olmocr repo |
| GPT-4o (Anchored) | 53.5 | 74.5 | 70.0 | 40.7 | 93.8 | 69.3 | 60.6 | 96.8 | 69.9 ± 1.1 | olmocr repo |
| Qwen 3 VL 8B | 70.2 | 75.1 | 45.6 | 37.5 | 89.1 | 62.1 | 43.0 | 94.3 | 64.6 ± 1.1 | Own benchmarks |
| Gemini Flash 2 (Anchored) | 54.5 | 56.1 | 72.1 | 34.2 | 64.7 | 61.5 | 71.5 | 95.6 | 63.8 ± 1.2 | olmocr repo |
Multilingual benchmark table
The table below covers the 43 most common languages, benchmarked across multiple models. For a comprehensive evaluation across 90 languages (Chandra 2 vs Gemini 2.5 Flash only), see the full 90-language benchmark.
| Language | Datalab API | Chandra 2 | Chandra 1 | Gemini 2.5 Flash | GPT-5 Mini |
|---|---|---|---|---|---|
| ar | 67.6% | 68.4% | 34.0% | 84.4% | 55.6% |
| bn | 85.1% | 72.8% | 45.6% | 55.3% | 23.3% |
| ca | 88.7% | 85.1% | 84.2% | 88.0% | 78.5% |
| cs | 88.2% | 85.3% | 84.7% | 79.1% | 78.8% |
| da | 90.1% | 91.1% | 88.4% | 86.0% | 87.7% |
| de | 93.8% | 94.8% | 83.0% | 88.3% | 93.8% |
| el | 89.9% | 85.6% | 85.5% | 83.5% | 82.4% |
| es | 91.8% | 89.3% | 88.7% | 86.8% | 97.1% |
| fa | 82.2% | 75.1% | 69.6% | 61.8% | 56.4% |
| fi | 85.7% | 83.4% | 78.4% | 86.0% | 84.7% |
| fr | 93.3% | 93.7% | 89.6% | 86.1% | 91.1% |
| gu | 73.8% | 70.8% | 44.6% | 47.6% | 11.5% |
| he | 76.4% | 70.4% | 38.9% | 50.9% | 22.3% |
| hi | 80.5% | 78.4% | 70.2% | 82.7% | 41.0% |
| hr | 93.4% | 90.1% | 85.9% | 88.2% | 81.3% |
| hu | 88.1% | 82.1% | 82.5% | 84.5% | 84.8% |
| id | 91.3% | 91.6% | 86.7% | 88.3% | 89.7% |
| it | 94.4% | 94.1% | 89.1% | 85.7% | 91.6% |
| ja | 87.3% | 86.9% | 85.4% | 80.0% | 76.1% |
| jv | 87.5% | 73.2% | 85.1% | 80.4% | 69.6% |
| kn | 70.0% | 63.2% | 20.6% | 24.5% | 10.1% |
| ko | 89.1% | 81.5% | 82.3% | 84.8% | 78.4% |
| la | 78.0% | 73.8% | 55.9% | 70.5% | 54.6% |
| ml | 72.4% | 64.3% | 18.1% | 23.8% | 11.9% |
| mr | 80.8% | 75.0% | 57.0% | 69.7% | 20.9% |
| nl | 90.0% | 88.6% | 85.3% | 87.5% | 83.8% |
| no | 89.2% | 90.3% | 85.5% | 87.8% | 87.4% |
| pl | 93.8% | 91.5% | 83.9% | 89.7% | 90.4% |
| pt | 97.0% | 95.2% | 84.3% | 89.4% | 90.8% |
| ro | 86.2% | 84.5% | 82.1% | 76.1% | 77.3% |
| ru | 88.8% | 85.5% | 88.7% | 82.8% | 72.2% |
| sa | 57.5% | 51.1% | 33.6% | 44.6% | 12.5% |
| sr | 95.3% | 90.3% | 82.3% | 89.7% | 83.0% |
| sv | 91.9% | 92.8% | 82.1% | 91.1% | 92.1% |
| ta | 82.9% | 77.7% | 50.8% | 53.9% | 8.1% |
| te | 69.4% | 58.6% | 19.5% | 33.3% | 9.9% |
| th | 71.6% | 62.6% | 47.0% | 66.7% | 53.8% |
| tr | 88.9% | 84.1% | 68.1% | 84.1% | 78.2% |
| uk | 93.1% | 91.0% | 88.5% | 87.9% | 81.9% |
| ur | 54.1% | 43.2% | 28.1% | 57.6% | 16.9% |
| vi | 85.0% | 80.4% | 81.6% | 89.5% | 83.6% |
| zh | 87.8% | 88.7% | 88.3% | 70.0% | 70.4% |
| Average | 80.4% | 77.8% | 69.4% | 67.6% | 60.5% |
Full 90-language benchmark table
We also have a more comprehensive evaluation covering 90 languages, comparing Chandra 2 against Gemini 2.5 Flash. The average scores are lower than the 43-language table above because this includes many lower-resource languages. Chandra 2 averages 72.7% vs Gemini 2.5 Flash at 60.8%.
See the full 90-language results.
Throughput
Benchmarked with vLLM on a single NVIDIA H100 80GB GPU using a diverse mix of documents (math, tables, scans, multi-column layouts) from the olmOCR benchmark set. This set is significantly slower than real-world usage - we estimate 2 pages/s in real-world usage.
| Configuration | Pages/sec | Avg Latency | P95 Latency | Failure Rate |
|---|---|---|---|---|
| vLLM, 96 concurrent sequences | 1.44 | 60s | 156s | 0% |
Credits
Thank you to the following open source projects:
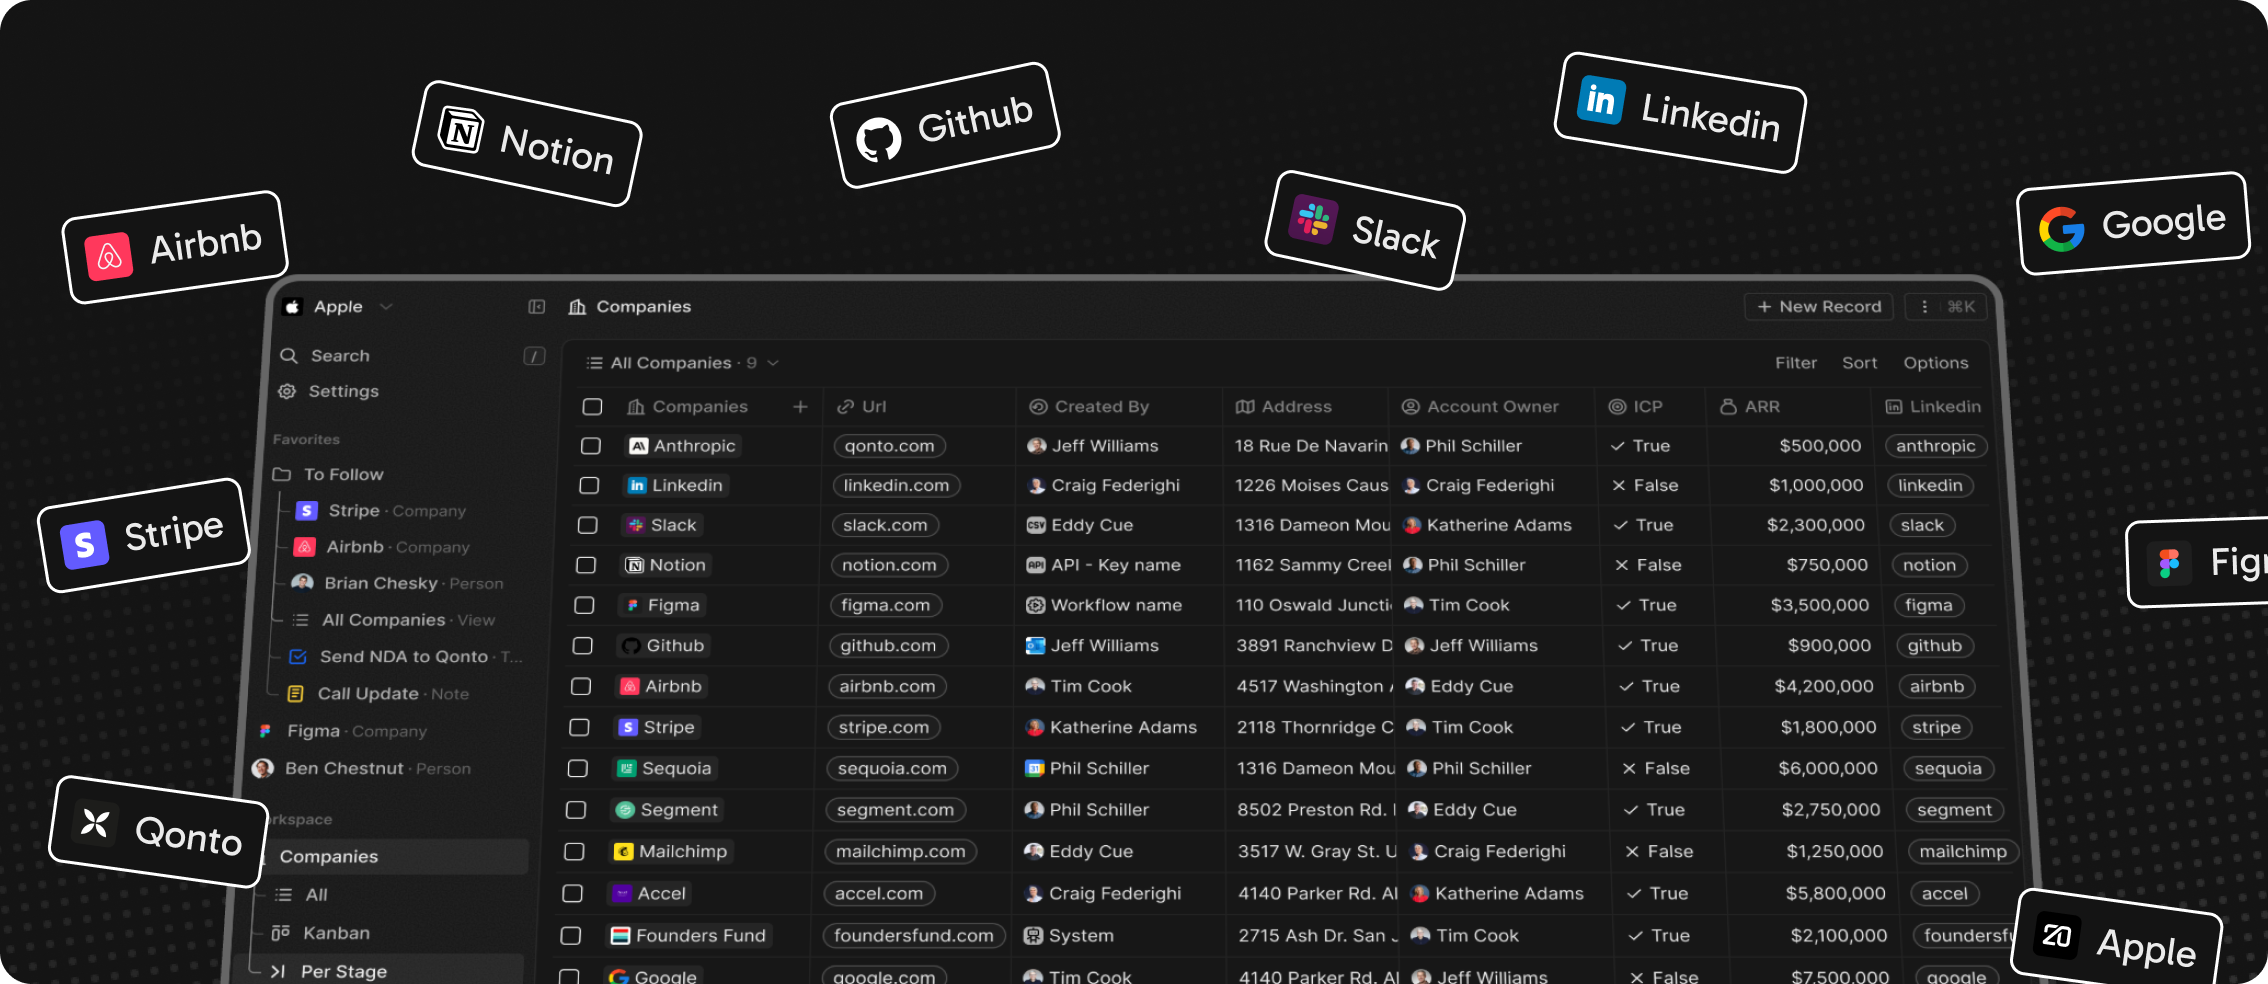
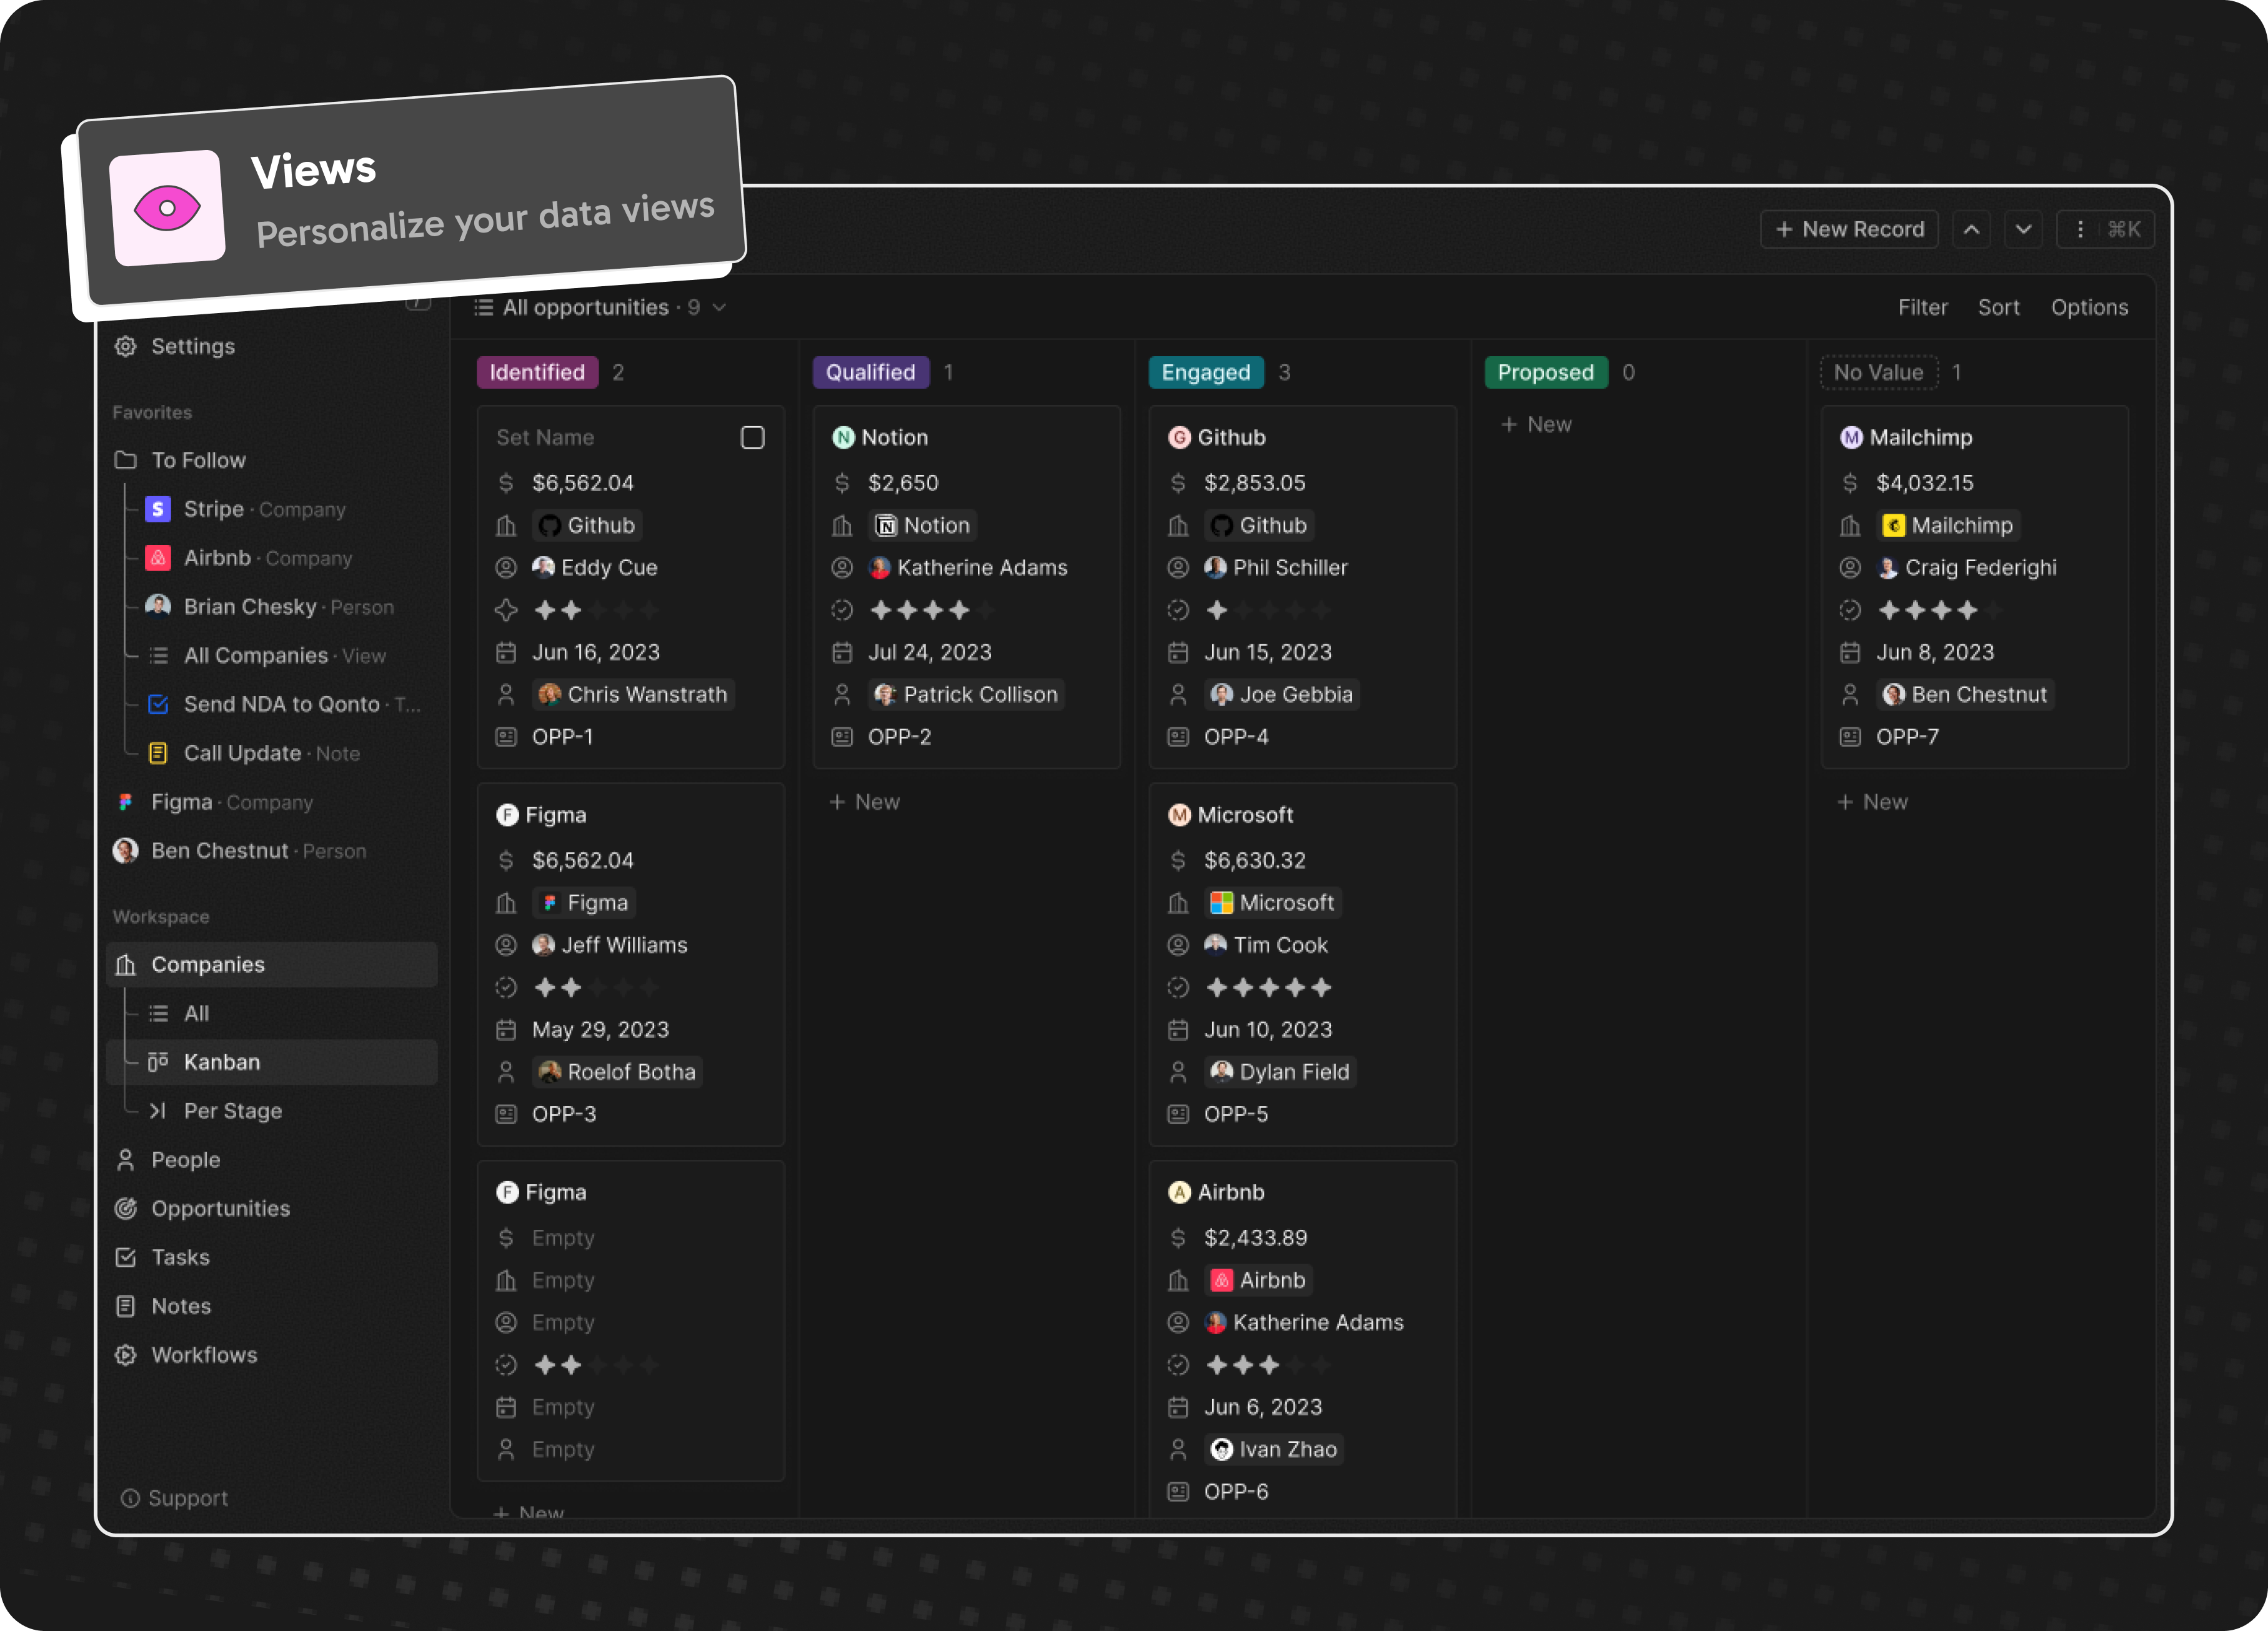
Building a modern alternative to Salesforce, powered by the community.
![]()
The #1 Open-Source CRM
🌐 Website · 📚 Documentation · ![]() Roadmap ·
Roadmap · ![]() Discord ·
Discord · ![]() Figma
Figma
Installation
See: 🚀 Self-hosting 🖥️ Local Setup
Why Twenty
We built Twenty for three reasons:
CRMs are too expensive, and users are trapped. Companies use locked-in customer data to hike prices. It shouldn't be that way.
A fresh start is required to build a better experience. We can learn from past mistakes and craft a cohesive experience inspired by new UX patterns from tools like Notion, Airtable or Linear.
We believe in open-source and community. Hundreds of developers are already building Twenty together. Once we have plugin capabilities, a whole ecosystem will grow around it.
What You Can Do With Twenty
Please feel free to flag any specific needs you have by creating an issue.
Below are a few features we have implemented to date:
- Personalize layouts with filters, sort, group by, kanban and table views
- Customize your objects and fields
- Create and manage permissions with custom roles
- Automate workflow with triggers and actions
- Emails, calendar events, files, and more
Personalize layouts with filters, sort, group by, kanban and table views
Customize your objects and fields

Create and manage permissions with custom roles

Automate workflow with triggers and actions

Emails, calendar events, files, and more

Stack
- TypeScript
- Nx
- NestJS, with BullMQ, PostgreSQL, Redis
- React, with Jotai, Linaria and Lingui
Thanks
![]()
![]()
![]()
![]()
![]()
Thanks to these amazing services that we use and recommend for UI testing (Chromatic), code review (Greptile), catching bugs (Sentry) and translating (Crowdin).
Join the Community
- Star the repo
- Subscribe to releases (watch -> custom -> releases)
- Follow us on Twitter or LinkedIn
- Join our Discord
- Improve translations on Crowdin
- Contributions are, of course, most welcome!
An autonomous agent for deep financial research
Dexter 🤖
Dexter is an autonomous financial research agent that thinks, plans, and learns as it works. It performs analysis using task planning, self-reflection, and real-time market data. Think Claude Code, but built specifically for financial research.
Table of Contents
- 👋 Overview
- ✅ Prerequisites
- 💻 How to Install
- 🚀 How to Run
- 📊 How to Evaluate
- 🐛 How to Debug
- 📱 How to Use with WhatsApp
- 🤝 How to Contribute
- 📄 License
👋 Overview
Dexter takes complex financial questions and turns them into clear, step-by-step research plans. It runs those tasks using live market data, checks its own work, and refines the results until it has a confident, data-backed answer.
Key Capabilities:
- Intelligent Task Planning: Automatically decomposes complex queries into structured research steps
- Autonomous Execution: Selects and executes the right tools to gather financial data
- Self-Validation: Checks its own work and iterates until tasks are complete
- Real-Time Financial Data: Access to income statements, balance sheets, and cash flow statements
- Safety Features: Built-in loop detection and step limits to prevent runaway execution

✅ Prerequisites
- Bun runtime (v1.0 or higher)
- OpenAI API key (get here)
- Financial Datasets API key (get here)
- Exa API key (get here) - optional, for web search
Installing Bun
If you don't have Bun installed, you can install it using curl:
macOS/Linux:
curl -fsSL https://bun.com/install | bash
Windows:
powershell -c "irm bun.sh/install.ps1|iex"
After installation, restart your terminal and verify Bun is installed:
bun --version
💻 How to Install
- Clone the repository:
git clone https://github.com/virattt/dexter.git
cd dexter
- Install dependencies with Bun:
bun install
- Set up your environment variables:
# Copy the example environment file
cp env.example .env

# Edit .env and add your API keys (if using cloud providers)
# OPENAI_API_KEY=your-openai-api-key
# ANTHROPIC_API_KEY=your-anthropic-api-key (optional)
# GOOGLE_API_KEY=your-google-api-key (optional)
# XAI_API_KEY=your-xai-api-key (optional)
# OPENROUTER_API_KEY=your-openrouter-api-key (optional)

# Institutional-grade market data for agents; AAPL, NVDA, MSFT are free
# FINANCIAL_DATASETS_API_KEY=your-financial-datasets-api-key

# (Optional) If using Ollama locally
# OLLAMA_BASE_URL=http://127.0.0.1:11434

# Web Search (Exa preferred, Tavily fallback)
# EXASEARCH_API_KEY=your-exa-api-key
# TAVILY_API_KEY=your-tavily-api-key
🚀 How to Run
Run Dexter in interactive mode:
bun start
Or with watch mode for development:
bun dev
📊 How to Evaluate
Dexter includes an evaluation suite that tests the agent against a dataset of financial questions. Evals use LangSmith for tracking and an LLM-as-judge approach for scoring correctness.
Run on all questions:
bun run src/evals/run.ts
Run on a random sample of data:
bun run src/evals/run.ts --sample 10
The eval runner displays a real-time UI showing progress, current question, and running accuracy statistics. Results are logged to LangSmith for analysis.
🐛 How to Debug
Dexter logs all tool calls to a scratchpad file for debugging and history tracking. Each query creates a new JSONL file in .dexter/scratchpad/.
Scratchpad location:
.dexter/scratchpad/
├── 2026-01-30-111400_9a8f10723f79.jsonl
├── 2026-01-30-143022_a1b2c3d4e5f6.jsonl
└── ...
Each file contains newline-delimited JSON entries tracking:
- init: The original query
- tool_result: Each tool call with arguments, raw result, and LLM summary
- thinking: Agent reasoning steps
Example scratchpad entry:
{"type":"tool_result","timestamp":"2026-01-30T11:14:05.123Z","toolName":"get_income_statements","args":{"ticker":"AAPL","period":"annual","limit":5},"result":{...},"llmSummary":"Retrieved 5 years of Apple annual income statements showing revenue growth from $274B to $394B"}
This makes it easy to inspect exactly what data the agent gathered and how it interpreted results.
📱 How to Use with WhatsApp
Chat with Dexter through WhatsApp by linking your phone to the gateway. Messages you send to yourself are processed by Dexter and responses are sent back to the same chat.
Quick start:
# Link your WhatsApp account (scan QR code)
bun run gateway:login

# Start the gateway
bun run gateway
Then open WhatsApp, go to your own chat (message yourself), and ask Dexter a question.
For detailed setup instructions, configuration options, and troubleshooting, see the WhatsApp Gateway README.
🤝 How to Contribute
- Fork the repository
- Create a feature branch
- Commit your changes
- Push to the branch
- Create a Pull Request
Important: Please keep your pull requests small and focused. This will make it easier to review and merge.
📄 License
This project is licensed under the MIT License.
Build and run agents you can see, understand and trust.

中文主页 | Tutorial | Roadmap (Jan 2026 -) | FAQ

What is AgentScope?
AgentScope is a production-ready, easy-to-use agent framework with essential abstractions that work with rising model capability and built-in support for finetuning.
We design for increasingly agentic LLMs. Our approach leverages the models' reasoning and tool use abilities rather than constraining them with strict prompts and opinionated orchestrations.
Why use AgentScope?
- Simple: start building your agents in 5 minutes with built-in ReAct agent, tools, skills, human-in-the-loop steering, memory, planning, realtime voice, evaluation and model finetuning
- Extensible: large number of ecosystem integrations for tools, memory and observability; built-in support for MCP and A2A; message hub for flexible multi-agent orchestration and workflows
- Production-ready: deploy and serve your agents locally, as serverless in the cloud, or on your K8s cluster with built-in OTel support
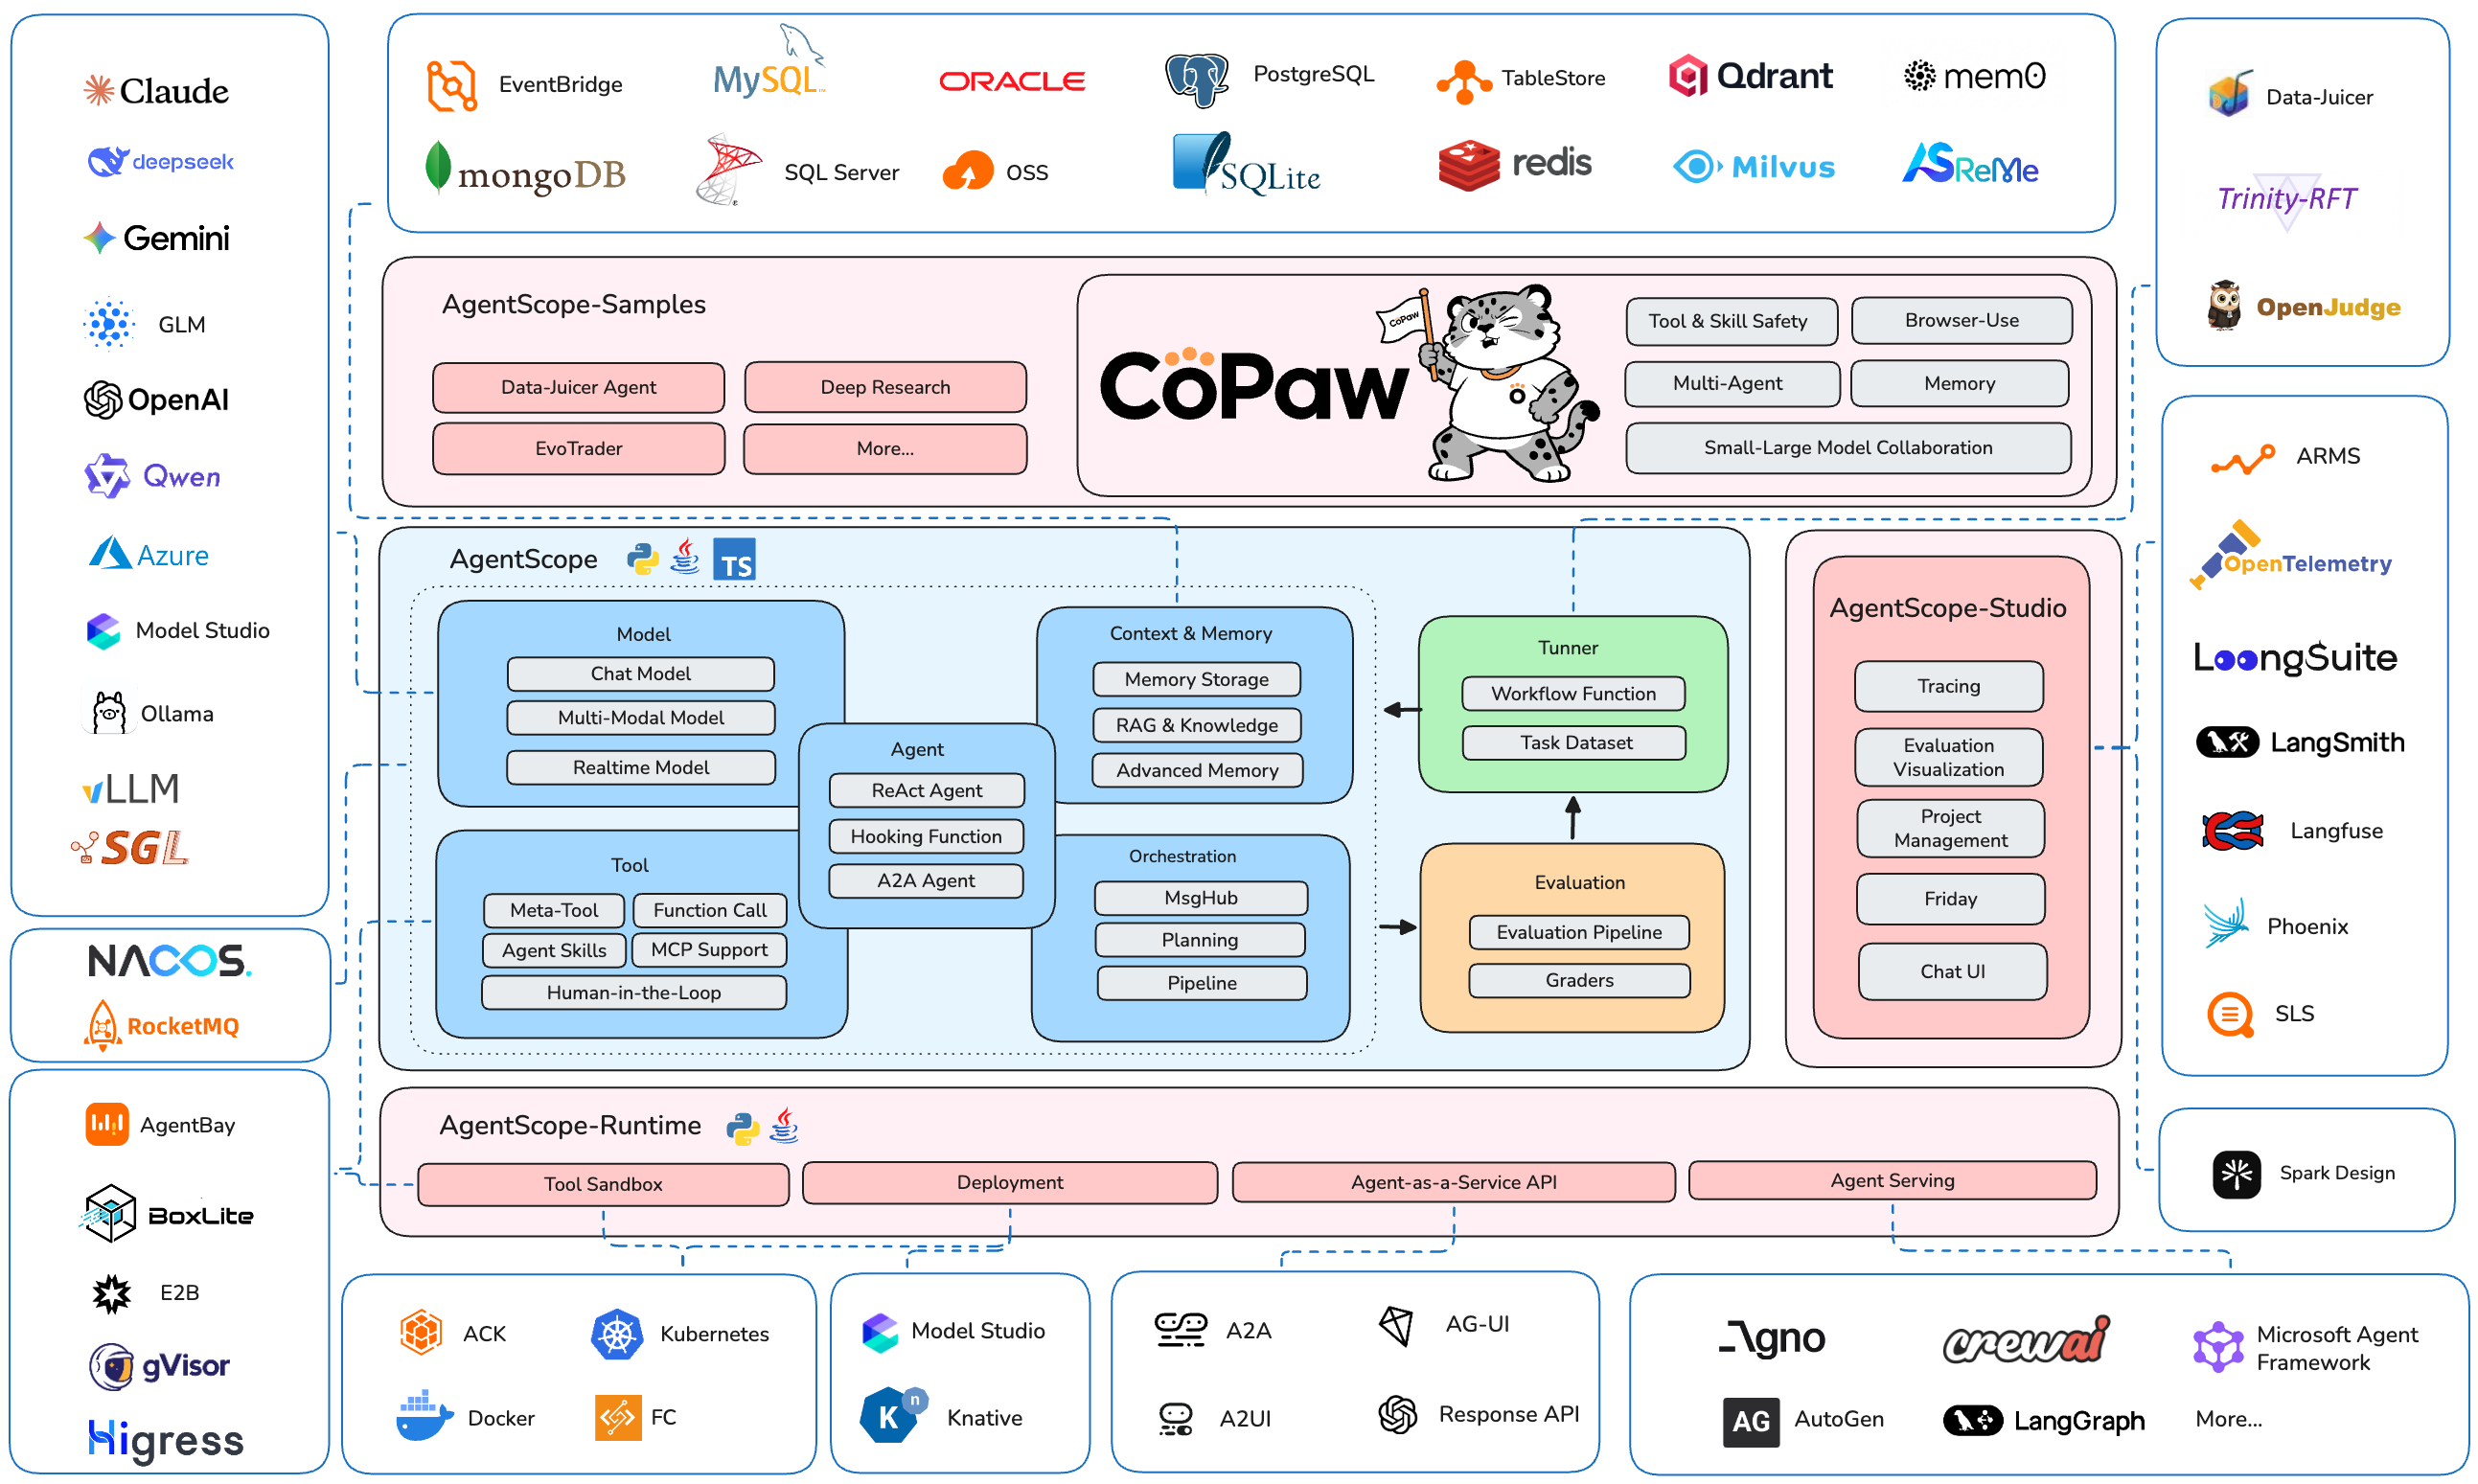
The AgentScope Ecosystem
News
- [2026-03]
RELS: We recently developed and open sourced an AI assistant named CoPaw (Co Personal Agent Workstation), built upon AgentScope, AgentScope-Runtime, and Reme. - [2026-02]
FEAT: Realtime Voice Agent support. Example | Multi-Agent Realtime Example | Tutorial - [2026-01]
COMM: Biweekly Meetings launched to share ecosystem updates and development plans - join us! Details & Schedule - [2026-01]
FEAT: Database support & memory compression in memory module. Example | Tutorial - [2025-12]
INTG: A2A (Agent-to-Agent) protocol support. Example | Tutorial - [2025-12]
FEAT: TTS (Text-to-Speech) support. Example | Tutorial - [2025-11]
INTG: Anthropic Agent Skill support. Example | Tutorial - [2025-11]
RELS: Alias-Agent for diverse real-world tasks and Data-Juicer Agent for data processing open-sourced. Alias-Agent | Data-Juicer Agent - [2025-11]
INTG: Agentic RL via Trinity-RFT library. Example | Trinity-RFT - [2025-11]
INTG: ReMe for enhanced long-term memory. Example - [2025-11]
RELS: agentscope-samples repository launched and agentscope-runtime upgraded with Docker/K8s deployment and VNC-powered GUI sandboxes. Samples | Runtime
Community
Welcome to join our community on
| Discord | DingTalk |
|---|---|
 |
 |
📑 Table of Contents
- Quickstart
- Example
- Documentation
- More Examples & Samples
- Contributing
- License
- Publications
- Contributors
Quickstart
Installation
AgentScope requires Python 3.10 or higher.
From PyPI
pip install agentscope
Or with uv:
uv pip install agentscope
From source
# Pull the source code from GitHub
git clone -b main https://github.com/agentscope-ai/agentscope.git

# Install the package in editable mode
cd agentscope

pip install -e .
# or with uv:
# uv pip install -e .
Example
Hello AgentScope!
Start with a conversation between user and a ReAct agent 🤖 named "Friday"!
from agentscope.agent import ReActAgent, UserAgent
from agentscope.model import DashScopeChatModel
from agentscope.formatter import DashScopeChatFormatter
from agentscope.memory import InMemoryMemory
from agentscope.tool import Toolkit, execute_python_code, execute_shell_command
import os, asyncio


async def main():
    toolkit = Toolkit()
    toolkit.register_tool_function(execute_python_code)
    toolkit.register_tool_function(execute_shell_command)

    agent = ReActAgent(
        name="Friday",
        sys_prompt="You're a helpful assistant named Friday.",
        model=DashScopeChatModel(
            model_name="qwen-max",
            api_key=os.environ["DASHSCOPE_API_KEY"],
            stream=True,
        ),
        memory=InMemoryMemory(),
        formatter=DashScopeChatFormatter(),
        toolkit=toolkit,
    )

    user = UserAgent(name="user")

    msg = None
    while True:
        msg = await agent(msg)
        msg = await user(msg)
        if msg.get_text_content() == "exit":
            break

asyncio.run(main())
Voice Agent
Create a voice-enabled ReAct agent that can understand and respond with speech, even playing a multi-agent werewolf game with voice interactions.
https://github.com/user-attachments/assets/c5f05254-aff6-4375-90df-85e8da95d5da
Realtime Voice Agent
Build a realtime voice agent with web interface that can interact with users via voice input and output.
Realtime chatbot | Realtime Multi-Agent Example
https://github.com/user-attachments/assets/1b7b114b-e995-4586-9b3f-d3bb9fcd2558
Human-in-the-loop
Support realtime interruption in ReActAgent: conversation can be interrupted via cancellation in realtime and resumed seamlessly via robust memory preservation.
Flexible MCP Usage
Use individual MCP tools as local callable functions to compose toolkits or wrap into a more complex tool.
from agentscope.mcp import HttpStatelessClient
from agentscope.tool import Toolkit
import os

async def fine_grained_mcp_control():
    # Initialize the MCP client
    client = HttpStatelessClient(
        name="gaode_mcp",
        transport="streamable_http",
        url=f"https://mcp.amap.com/mcp?key={os.environ['GAODE_API_KEY']}",
    )

    # Obtain the MCP tool as a **local callable function**, and use it anywhere
    func = await client.get_callable_function(func_name="maps_geo")

    # Option 1: Call directly
    await func(address="Tiananmen Square", city="Beijing")

    # Option 2: Pass to agent as a tool
    toolkit = Toolkit()
    toolkit.register_tool_function(func)
    # ...

    # Option 3: Wrap into a more complex tool
    # ...
Agentic RL
Train your agentic application seamlessly with Reinforcement Learning integration. We also prepare multiple sample projects covering various scenarios:
| Example | Description | Model | Training Result |
|---|---|---|---|
| Math Agent | Tune a math-solving agent with multi-step reasoning. | Qwen3-0.6B | Accuracy: 75% → 85% |
| Frozen Lake | Train an agent to navigate the Frozen Lake environment. | Qwen2.5-3B-Instruct | Success rate: 15% → 86% |
| Learn to Ask | Tune agents using LLM-as-a-judge for automated feedback. | Qwen2.5-7B-Instruct | Accuracy: 47% → 92% |
| Email Search | Improve tool-use capabilities without labeled ground truth. | Qwen3-4B-Instruct-2507 | Accuracy: 60% |
| Werewolf Game | Train agents for strategic multi-agent game interactions. | Qwen2.5-7B-Instruct | Werewolf win rate: 50% → 80% |
| Data Augment | Generate synthetic training data to enhance tuning results. | Qwen3-0.6B | AIME-24 accuracy: 20% → 60% |
Multi-Agent Workflows
AgentScope provides MsgHub and pipelines to streamline multi-agent conversations, offering efficient message routing and seamless information sharing
from agentscope.pipeline import MsgHub, sequential_pipeline
from agentscope.message import Msg
import asyncio

async def multi_agent_conversation():
    # Create agents
    agent1 = ...
    agent2 = ...
    agent3 = ...
    agent4 = ...

    # Create a message hub to manage multi-agent conversation
    async with MsgHub(
        participants=[agent1, agent2, agent3],
        announcement=Msg("Host", "Introduce yourselves.", "assistant")
    ) as hub:
        # Speak in a sequential manner
        await sequential_pipeline([agent1, agent2, agent3])
        # Dynamic manage the participants
        hub.add(agent4)
        hub.delete(agent3)
        await hub.broadcast(Msg("Host", "Goodbye!", "assistant"))

asyncio.run(multi_agent_conversation())
Documentation
More Examples & Samples
Functionality
- MCP
- Anthropic Agent Skill
- Plan
- Structured Output
- RAG
- Long-Term Memory
- Session with SQLite
- Stream Printing Messages
- TTS
- Code-first Deployment
- Memory Compression
Agent
- ReAct Agent
- Voice Agent
- Deep Research Agent
- Browser-use Agent
- Meta Planner Agent
- A2A Agent
- Realtime Voice Agent
Game
Workflow
- Multi-agent Debate
- Multi-agent Conversation
- Multi-agent Concurrent
- Multi-agent Realtime Conversation
Evaluation
Tuner
Contributing
We welcome contributions from the community! Please refer to our CONTRIBUTING.md for guidelines on how to contribute.
License
AgentScope is released under Apache License 2.0.
Publications
If you find our work helpful for your research or application, please cite our papers.
@article{agentscope_v1,
    author  = {Dawei Gao, Zitao Li, Yuexiang Xie, Weirui Kuang, Liuyi Yao, Bingchen Qian, Zhijian Ma, Yue Cui, Haohao Luo, Shen Li, Lu Yi, Yi Yu, Shiqi He, Zhiling Luo, Wenmeng Zhou, Zhicheng Zhang, Xuguang He, Ziqian Chen, Weikai Liao, Farruh Isakulovich Kushnazarov, Yaliang Li, Bolin Ding, Jingren Zhou}
    title   = {AgentScope 1.0: A Developer-Centric Framework for Building Agentic Applications},
    journal = {CoRR},
    volume  = {abs/2508.16279},
    year    = {2025},
}

@article{agentscope,
    author  = {Dawei Gao, Zitao Li, Xuchen Pan, Weirui Kuang, Zhijian Ma, Bingchen Qian, Fei Wei, Wenhao Zhang, Yuexiang Xie, Daoyuan Chen, Liuyi Yao, Hongyi Peng, Zeyu Zhang, Lin Zhu, Chen Cheng, Hongzhu Shi, Yaliang Li, Bolin Ding, Jingren Zhou}
    title   = {AgentScope: A Flexible yet Robust Multi-Agent Platform},
    journal = {CoRR},
    volume  = {abs/2402.14034},
    year    = {2024},
}
Contributors
All thanks to our contributors:
The AI Scientist-v2: Workshop-Level Automated Scientific Discovery via Agentic Tree Search
The AI Scientist-v2: Workshop-Level Automated
Scientific Discovery via Agentic Tree Search
📚 [Paper] | 📝 [Blog Post] | 📂 [ICLR2025 Workshop Experiment]
Fully autonomous scientific research systems are becoming increasingly capable, with AI playing a pivotal role in transforming how scientific discoveries are made. We are excited to introduce The AI Scientist-v2, a generalized end-to-end agentic system that has generated the first workshop paper written entirely by AI and accepted through peer review.
This system autonomously generates hypotheses, runs experiments, analyzes data, and writes scientific manuscripts. Unlike its predecessor (AI Scientist-v1), the AI Scientist-v2 removes reliance on human-authored templates, generalizes across Machine Learning (ML) domains, and employs a progressive agentic tree search, guided by an experiment manager agent.
Note: The AI Scientist-v2 doesn’t necessarily produce better papers than v1, especially when a strong starting template is available. v1 follows well-defined templates, leading to high success rates, while v2 takes a broader, more exploratory approach with lower success rates. v1 works best for tasks with clear objectives and a solid foundation, whereas v2 is designed for open-ended scientific exploration.
Caution! This codebase will execute Large Language Model (LLM)-written code. There are various risks and challenges associated with this autonomy, including the potential use of dangerous packages, uncontrolled web access, and the possibility of spawning unintended processes. Ensure that you run this within a controlled sandbox environment (e.g., a Docker container). Use at your own discretion.
Table of Contents
- Requirements
- Generate Research Ideas
- Run AI Scientist-v2 Paper Generation Experiments
- Citing The AI Scientist-v2
- Frequently Asked Questions
- Acknowledgement
Requirements
This code is designed to run on Linux with NVIDIA GPUs using CUDA and PyTorch.
Installation
# Create a new conda environment
conda create -n ai_scientist python=3.11
conda activate ai_scientist

# Install PyTorch with CUDA support (adjust pytorch-cuda version for your setup)
conda install pytorch torchvision torchaudio pytorch-cuda=12.4 -c pytorch -c nvidia

# Install PDF and LaTeX tools
conda install anaconda::poppler
conda install conda-forge::chktex

# Install Python package requirements
pip install -r requirements.txt
Installation usually takes no more than one hour.
Supported Models and API Keys
OpenAI Models
By default, the system uses the OPENAI_API_KEY environment variable for OpenAI models.
Gemini Models
By default, the system uses the GEMINI_API_KEY environment variable for Gemini models through OpenAI API.
Claude Models via AWS Bedrock
To use Claude models provided by Amazon Bedrock, install the necessary additional packages:
pip install anthropic[bedrock]
Next, configure valid AWS Credentials and the target AWS Region by setting the following environment variables: AWS_ACCESS_KEY_ID, AWS_SECRET_ACCESS_KEY, AWS_REGION_NAME.
Semantic Scholar API (Literature Search)
Our code can optionally use a Semantic Scholar API Key (S2_API_KEY) for higher throughput during literature search if you have one. This is used during both the ideation and paper writing stages. The system should work without it, though you might encounter rate limits or reduced novelty checking during ideation. If you experience issues with Semantic Scholar, you can skip the citation phase during paper generation.
Setting API Keys
Ensure you provide the necessary API keys as environment variables for the models you intend to use. For example:
export OPENAI_API_KEY="YOUR_OPENAI_KEY_HERE"
export S2_API_KEY="YOUR_S2_KEY_HERE"
# Set AWS credentials if using Bedrock
# export AWS_ACCESS_KEY_ID="YOUR_AWS_ACCESS_KEY_ID"
# export AWS_SECRET_ACCESS_KEY="YOUR_AWS_SECRET_KEY"
# export AWS_REGION_NAME="your-aws-region"
Generate Research Ideas
Before running the full AI Scientist-v2 experiment pipeline, you first use the ai_scientist/perform_ideation_temp_free.py script to generate potential research ideas. This script uses an LLM to brainstorm and refine ideas based on a high-level topic description you provide, interacting with tools like Semantic Scholar to check for novelty.
-
Prepare a Topic Description: Create a Markdown file (e.g.,
my_research_topic.md) describing the research area or theme you want the AI to explore. This file should contain sections likeTitle,Keywords,TL;DR, andAbstractto define the scope of the research. Refer to the example fileai_scientist/ideas/i_cant_believe_its_not_better.mdfor the expected structure and content format. Place your file in a location accessible by the script (e.g., theai_scientist/ideas/directory). -
Run the Ideation Script: Execute the script from the main project directory, pointing it to your topic description file and specifying the desired LLM.
python ai_scientist/perform_ideation_temp_free.py \ --workshop-file "ai_scientist/ideas/my_research_topic.md" \ --model gpt-4o-2024-05-13 \ --max-num-generations 20 \ --num-reflections 5--workshop-file: Path to your topic description Markdown file.--model: The LLM to use for generating ideas (ensure you have the corresponding API key set).--max-num-generations: How many distinct research ideas to attempt generating.--num-reflections: How many refinement steps the LLM should perform for each idea.
-
Output: The script will generate a JSON file named after your input Markdown file (e.g.,
ai_scientist/ideas/my_research_topic.json). This file will contain a list of structured research ideas, including hypotheses, proposed experiments, and related work analysis. -
Proceed to Experiments: Once you have the generated JSON file containing research ideas, you can proceed to the next section to run the experiments.
This ideation step guides the AI Scientist towards specific areas of interest and produces concrete research directions to be tested in the main experimental pipeline.
Run AI Scientist-v2 Paper Generation Experiments
Using the JSON file generated in the previous ideation step, you can now launch the main AI Scientist-v2 pipeline. This involves running experiments via agentic tree search, analyzing results, and generating a paper draft.
Specify the models used for the write-up and review phases via command-line arguments. The configuration for the best-first tree search (BFTS) is located in bfts_config.yaml. Adjust parameters in this file as needed.
Key tree search configuration parameters in bfts_config.yaml:
agentconfig:- Set
num_workers(number of parallel exploration paths) andsteps(maximum number of nodes to explore). For example, ifnum_workers=3andsteps=21, the tree search will explore up to 21 nodes, expanding 3 nodes concurrently at each step. num_seeds: Should generally be the same asnum_workersifnum_workersis less than 3. Otherwise, setnum_seedsto 3.- Note: Other agent parameters like
k_fold_validation,expose_prediction, anddata_previeware not used in the current version.
- Set
searchconfig:max_debug_depth: The maximum number of times the agent will attempt to debug a failing node before abandoning that search path.debug_prob: The probability of attempting to debug a failing node.num_drafts: The number of initial root nodes (i.e., the number of independent trees to grow) during Stage 1.
Example command to run AI-Scientist-v2 using a generated idea file (e.g., my_research_topic.json). Please review bfts_config.yaml for detailed tree search parameters (the default config includes claude-3-5-sonnet for experiments). Do not set load_code if you do not want to initialize experimentation with a code snippet.
python launch_scientist_bfts.py \
 --load_ideas "ai_scientist/ideas/my_research_topic.json" \
 --load_code \
 --add_dataset_ref \
 --model_writeup o1-preview-2024-09-12 \
 --model_citation gpt-4o-2024-11-20 \
 --model_review gpt-4o-2024-11-20 \
 --model_agg_plots o3-mini-2025-01-31 \
 --num_cite_rounds 20
Once the initial experimental stage is complete, you will find a timestamped log folder inside the experiments/ directory. Navigate to experiments/"timestamp_ideaname"/logs/0-run/ within that folder to find the tree visualization file unified_tree_viz.html. After all experiment stages are complete, the writeup stage begins. The writeup stage typically takes about 20 to 30 minutes in total. Once it finishes, you should see timestamp_ideaname.pdf in the timestamp_ideaname folder. For this example run, all stages typically finish within several hours.
Citing The AI Scientist-v2
If you use The AI Scientist-v2 in your research, please cite our work as follows:
@article{aiscientist_v2,
  title={The AI Scientist-v2: Workshop-Level Automated Scientific Discovery via Agentic Tree Search},
  author={Yamada, Yutaro and Lange, Robert Tjarko and Lu, Cong and Hu, Shengran and Lu, Chris and Foerster, Jakob and Clune, Jeff and Ha, David},
  journal={arXiv preprint arXiv:2504.08066},
  year={2025}
}
Frequently Asked Questions
Why wasn't a PDF or a review generated for my experiment?
The AI Scientist-v2 completes experiments with a success rate that depends on the chosen foundation model, and the complexity of the idea. Higher success rates are generally observed when using powerful models like Claude 3.5 Sonnet for the experimentation phase.
What is the estimated cost per experiment?
The ideation step cost depends on the LLM used and the number of generations/reflections, but is generally low (a few dollars). For the main experiment pipeline, using Claude 3.5 Sonnet for the experimentation phase typically costs around $15–$20 per run. The subsequent writing phase adds approximately $5 when using the default models specified in the example command. Using GPT-4o for model_citation is recommended as it can help reduce writing costs.
How do I run The AI Scientist-v2 for different subject fields?
First, perform the Generate Research Ideas step. Create a new Markdown file describing your desired subject field or topic, following the structure of the example ai_scientist/ideas/i_cant_believe_its_not_better.md. Run the perform_ideation_temp_free.py script with this file to generate a corresponding JSON idea file. Then, proceed to the Run AI Scientist-v2 Paper Generation Experiments step, using this JSON file with the launch_scientist_bfts.py script via the --load_ideas argument.
What should I do if I have problems accessing the Semantic Scholar API?
The Semantic Scholar API is used to assess the novelty of generated ideas and to gather citations during the paper write-up phase. If you don't have an API key, encounter rate limits, you may be able to skip these phases.
I encountered a "CUDA Out of Memory" error. What can I do?
This error typically occurs when the AI Scientist-v2 attempts to load or run a model that requires more GPU memory than available on your system. To resolve this, you can try updating your ideation prompt file (ai_scientist/ideas/my_research_topic.md) to suggest using smaller models for the experiments.
Acknowledgement
The tree search component implemented within the ai_scientist directory is built on top of the AIDE project. We thank the AIDE developers for their valuable contributions and for making their work publicly available.
Star History
⚖️ License & Responsible Use
This project is licensed under The AI Scientist Source Code License (a derivative of the Responsible AI License).
Mandatory Disclosure: By using this code, you are legally bound to clearly and prominently disclose the use of AI in any resulting scientific manuscripts or papers.
We recommend the following attribution in your paper's Abstract or Methods section:
"This manuscript was autonomously generated using The AI Scientist."
An agentic skills framework & software development methodology that works.
Superpowers
Superpowers is a complete software development workflow for your coding agents, built on top of a set of composable "skills" and some initial instructions that make sure your agent uses them.
How it works
It starts from the moment you fire up your coding agent. As soon as it sees that you're building something, it doesn't just jump into trying to write code. Instead, it steps back and asks you what you're really trying to do.
Once it's teased a spec out of the conversation, it shows it to you in chunks short enough to actually read and digest.
After you've signed off on the design, your agent puts together an implementation plan that's clear enough for an enthusiastic junior engineer with poor taste, no judgement, no project context, and an aversion to testing to follow. It emphasizes true red/green TDD, YAGNI (You Aren't Gonna Need It), and DRY.
Next up, once you say "go", it launches a subagent-driven-development process, having agents work through each engineering task, inspecting and reviewing their work, and continuing forward. It's not uncommon for Claude to be able to work autonomously for a couple hours at a time without deviating from the plan you put together.
There's a bunch more to it, but that's the core of the system. And because the skills trigger automatically, you don't need to do anything special. Your coding agent just has Superpowers.
Sponsorship
If Superpowers has helped you do stuff that makes money and you are so inclined, I'd greatly appreciate it if you'd consider sponsoring my opensource work.
Thanks!
- Jesse
Installation
Note: Installation differs by platform. Claude Code or Cursor have built-in plugin marketplaces. Codex and OpenCode require manual setup.
Claude Code Official Marketplace
Superpowers is available via the official Claude plugin marketplace
Install the plugin from Claude marketplace:
/plugin install superpowers@claude-plugins-official
Claude Code (via Plugin Marketplace)
In Claude Code, register the marketplace first:
/plugin marketplace add obra/superpowers-marketplace
Then install the plugin from this marketplace:
/plugin install superpowers@superpowers-marketplace
Cursor (via Plugin Marketplace)
In Cursor Agent chat, install from marketplace:
/add-plugin superpowers
or search for "superpowers" in the plugin marketplace.
Codex
Tell Codex:
Fetch and follow instructions from https://raw.githubusercontent.com/obra/superpowers/refs/heads/main/.codex/INSTALL.md
Detailed docs: docs/README.codex.md
OpenCode
Tell OpenCode:
Fetch and follow instructions from https://raw.githubusercontent.com/obra/superpowers/refs/heads/main/.opencode/INSTALL.md
Detailed docs: docs/README.opencode.md
Gemini CLI
gemini extensions install https://github.com/obra/superpowers
To update:
gemini extensions update superpowers
Verify Installation
Start a new session in your chosen platform and ask for something that should trigger a skill (for example, "help me plan this feature" or "let's debug this issue"). The agent should automatically invoke the relevant superpowers skill.
The Basic Workflow
-
brainstorming - Activates before writing code. Refines rough ideas through questions, explores alternatives, presents design in sections for validation. Saves design document.
-
using-git-worktrees - Activates after design approval. Creates isolated workspace on new branch, runs project setup, verifies clean test baseline.
-
writing-plans - Activates with approved design. Breaks work into bite-sized tasks (2-5 minutes each). Every task has exact file paths, complete code, verification steps.
-
subagent-driven-development or executing-plans - Activates with plan. Dispatches fresh subagent per task with two-stage review (spec compliance, then code quality), or executes in batches with human checkpoints.
-
test-driven-development - Activates during implementation. Enforces RED-GREEN-REFACTOR: write failing test, watch it fail, write minimal code, watch it pass, commit. Deletes code written before tests.
-
requesting-code-review - Activates between tasks. Reviews against plan, reports issues by severity. Critical issues block progress.
-
finishing-a-development-branch - Activates when tasks complete. Verifies tests, presents options (merge/PR/keep/discard), cleans up worktree.
The agent checks for relevant skills before any task. Mandatory workflows, not suggestions.
What's Inside
Skills Library
Testing
- test-driven-development - RED-GREEN-REFACTOR cycle (includes testing anti-patterns reference)
Debugging
- systematic-debugging - 4-phase root cause process (includes root-cause-tracing, defense-in-depth, condition-based-waiting techniques)
- verification-before-completion - Ensure it's actually fixed
Collaboration
- brainstorming - Socratic design refinement
- writing-plans - Detailed implementation plans
- executing-plans - Batch execution with checkpoints
- dispatching-parallel-agents - Concurrent subagent workflows
- requesting-code-review - Pre-review checklist
- receiving-code-review - Responding to feedback
- using-git-worktrees - Parallel development branches
- finishing-a-development-branch - Merge/PR decision workflow
- subagent-driven-development - Fast iteration with two-stage review (spec compliance, then code quality)
Meta
- writing-skills - Create new skills following best practices (includes testing methodology)
- using-superpowers - Introduction to the skills system
Philosophy
- Test-Driven Development - Write tests first, always
- Systematic over ad-hoc - Process over guessing
- Complexity reduction - Simplicity as primary goal
- Evidence over claims - Verify before declaring success
Read more: Superpowers for Claude Code
Contributing
Skills live directly in this repository. To contribute:
- Fork the repository
- Create a branch for your skill
- Follow the
writing-skillsskill for creating and testing new skills - Submit a PR
See skills/writing-skills/SKILL.md for the complete guide.
Updating
Skills update automatically when you update the plugin:
/plugin update superpowers
License
MIT License - see LICENSE file for details
Community
Superpowers is built by Jesse Vincent and the rest of the folks at Prime Radiant.
For community support, questions, and sharing what you're building with Superpowers, join us on Discord.
Support
- Discord: Join us on Discord
- Issues: https://github.com/obra/superpowers/issues
- Marketplace: https://github.com/obra/superpowers-marketplace
Open Source AI Platform - AI Chat with advanced features that works with every LLM
Open Source AI Platform
![]()


Onyx is a feature-rich, self-hostable Chat UI that works with any LLM. It is easy to deploy and can run in a completely airgapped environment.
Onyx comes loaded with advanced features like Agents, Web Search, RAG, MCP, Deep Research, Connectors to 40+ knowledge sources, and more.
[!TIP] Run Onyx with one command (or see deployment section below):
curl -fsSL https://onyx.app/install_onyx.sh | bash

⭐ Features
- 🤖 Custom Agents: Build AI Agents with unique instructions, knowledge and actions.
- 🌍 Web Search: Browse the web with Google PSE, Exa, and Serper as well as an in-house scraper or Firecrawl.
- 🔍 RAG: Best in class hybrid-search + knowledge graph for uploaded files and ingested documents from connectors.
- 🔄 Connectors: Pull knowledge, metadata, and access information from over 40 applications.
- 🔬 Deep Research: Get in depth answers with an agentic multi-step search.
- ▶️ Actions & MCP: Give AI Agents the ability to interact with external systems.
- 💻 Code Interpreter: Execute code to analyze data, render graphs and create files.
- 🎨 Image Generation: Generate images based on user prompts.
- 👥 Collaboration: Chat sharing, feedback gathering, user management, usage analytics, and more.
Onyx works with all LLMs (like OpenAI, Anthropic, Gemini, etc.) and self-hosted LLMs (like Ollama, vLLM, etc.)
To learn more about the features, check out our documentation!
🚀 Deployment
Onyx supports deployments in Docker, Kubernetes, Terraform, along with guides for major cloud providers.
See guides below:
- Docker or Quickstart (best for most users)
- Kubernetes (best for large teams)
- Terraform (best for teams already using Terraform)
- Cloud specific guides (best if specifically using AWS EKS, Azure VMs, etc.)
[!TIP]
To try Onyx for free without deploying, check out Onyx Cloud.
🔍 Other Notable Benefits
Onyx is built for teams of all sizes, from individual users to the largest global enterprises.
- Enterprise Search: far more than simple RAG, Onyx has custom indexing and retrieval that remains performant and accurate for scales of up to tens of millions of documents.
- Security: SSO (OIDC/SAML/OAuth2), RBAC, encryption of credentials, etc.
- Management UI: different user roles such as basic, curator, and admin.
- Document Permissioning: mirrors user access from external apps for RAG use cases.
🚧 Roadmap
To see ongoing and upcoming projects, check out our roadmap!
📚 Licensing
There are two editions of Onyx:
- Onyx Community Edition (CE) is available freely under the MIT license.
- Onyx Enterprise Edition (EE) includes extra features that are primarily useful for larger organizations. For feature details, check out our website.
👪 Community
Join our open source community on Discord!
💡 Contributing
Looking to contribute? Please check out the Contribution Guide for more details.
Apache Superset is a Data Visualization and Data Exploration Platform
Superset
![]()

![]()
![]()


![]()
![]()
A modern, enterprise-ready business intelligence web application.
Documentation
- User Guide — For analysts and business users. Explore data, build charts, create dashboards, and connect databases.
- Administrator Guide — Install, configure, and operate Superset. Covers security, scaling, and database drivers.
- Developer Guide — Contribute to Superset or build on its REST API and extension framework.
Why Superset? | Supported Databases | Release Notes | Get Involved | Resources | Organizations Using Superset
Why Superset?
Superset is a modern data exploration and data visualization platform. Superset can replace or augment proprietary business intelligence tools for many teams. Superset integrates well with a variety of data sources.
Superset provides:
- A no-code interface for building charts quickly
- A powerful, web-based SQL Editor for advanced querying
- A lightweight semantic layer for quickly defining custom dimensions and metrics
- Out of the box support for nearly any SQL database or data engine
- A wide array of beautiful visualizations to showcase your data, ranging from simple bar charts to geospatial visualizations
- Lightweight, configurable caching layer to help ease database load
- Highly extensible security roles and authentication options
- An API for programmatic customization
- A cloud-native architecture designed from the ground up for scale
Screenshots & Gifs
Video Overview
Large Gallery of Visualizations

Craft Beautiful, Dynamic Dashboards

No-Code Chart Builder

Powerful SQL Editor

Supported Databases
Superset can query data from any SQL-speaking datastore or data engine (Presto, Trino, Athena, and more) that has a Python DB-API driver and a SQLAlchemy dialect.
Here are some of the major database solutions that are supported:
![]()
![]()
![]()
![]()
![]()
![]()
![]()
![]()
![]()
![]()
![]()
![]()
![]()
![]()
![]()
![]()
![]()
![]()
![]()
![]()
![]()
![]()
![]()
![]()
![]()
![]()
![]()
![]()
![]()
![]()
![]()
![]()
![]()
![]()
![]()
![]()
![]()
![]()
![]()
![]()
![]()
![]()
![]()
![]()
![]()
![]()
![]()
![]()
![]()
![]()
![]()
![]()
![]()
![]()
![]()
![]()
![]()
![]()
![]()
![]()
![]()
A more comprehensive list of supported databases along with the configuration instructions can be found here.
Want to add support for your datastore or data engine? Read more here about the technical requirements.
Installation and Configuration
Try out Superset's quickstart guide or learn about the options for production deployments.
Get Involved
- Ask and answer questions on StackOverflow using the apache-superset tag
- Join our community's Slack and please read our Slack Community Guidelines
- Join our dev@superset.apache.org Mailing list. To join, simply send an email to dev-subscribe@superset.apache.org
- If you want to help troubleshoot GitHub Issues involving the numerous database drivers that Superset supports, please consider adding your name and the databases you have access to on the Superset Database Familiarity Rolodex
- Join Superset's Town Hall and Operational Model recurring meetings. Meeting info is available on the Superset Community Calendar
Contributor Guide
Interested in contributing? Check out our Developer Guide to find resources around contributing along with a detailed guide on how to set up a development environment.
Resources
- Superset "In the Wild" - see who's using Superset, and add your organization to the list!
- Feature Flags - the status of Superset's Feature Flags.
- Standard Roles - How RBAC permissions map to roles.
- Superset Wiki - Tons of additional community resources: best practices, community content and other information.
- Superset SIPs - The status of Superset's SIPs (Superset Improvement Proposals) for both consensus and implementation status.
Understanding the Superset Points of View
-
Getting Started with Superset
-
Deploying Superset
-
Recordings of Past Superset Community Events
-
Visualizations
Repo Activity

